Convex and Concave Lenses
TLDRThis educational video script explores the principles of image formation through spherical lenses, offering an engaging and visual guide. It explains the light ray rules for both convex and concave lenses, demonstrating how to draw ray diagrams and determine image properties such as real/virtual, inverted/upright, and magnified/diminished. The script uses the presenter as an object to illustrate the concepts, providing practical examples for a deeper understanding. It concludes with a challenge of top three questions to reinforce learning, encouraging viewers to apply the concepts discussed.
Takeaways
- 🔍 The video discusses image formation with spherical lenses, specifically convex and concave lenses, and uses the presenter as an object to demonstrate the concept.
- 📚 Light ray rules for spherical lenses are similar to those for spherical mirrors and are essential for drawing ray diagrams to determine image properties.
- 👓 Convex lenses are converging lenses and can form real, inverted images that can be magnified, diminished, or the same size as the object, depending on the object's position relative to the lens.
- 🔍 For convex lenses, three key rules are highlighted: rays parallel to the principal axis refract through the focus, rays through the optical center continue undeviated, and rays through the focus refract to become parallel to the principal axis.
- 📏 The presenter demonstrates different cases of image formation with a convex lens by standing at various positions along the principal axis, showing how the image changes with each position.
- 🤔 The video emphasizes the importance of understanding the nature of the image (real or virtual, inverted or upright, magnified, diminished, or same size) and its position relative to the lens.
- 🔬 When the object is beyond 2F (twice the focal length) of a convex lens, the image formed is real, inverted, and diminished, located between F2 and 2F.
- 🎭 At 2F1 (twice the focal length from the first focus), the image is real, inverted, and the same size as the object, positioned at 2F2.
- 🌌 If the object is placed at the focus of a convex lens, the image is formed at infinity, real, inverted, and highly magnified.
- 🔍 For concave lenses, which are diverging, the image formed is always virtual, upright, diminished, and located between the object and the lens, regardless of the object's position.
- 📝 The video concludes with a call to action for viewers to practice solving the top three questions related to image formation with spherical lenses and to engage with the content by commenting with their answers.
Q & A
What is the main purpose of the video script?
-The main purpose of the video script is to explain the concept of image formation by spherical lenses, specifically convex and concave lenses, using light ray rules and ray diagrams.
What are the three light ray rules for a convex lens?
-The three light ray rules for a convex lens are: 1) A ray parallel to the principal axis refracts through the focus on the other side of the lens. 2) A ray passing through the optical center goes straight without deviation. 3) A ray passing through the focus refracts to become parallel to the principal axis.
How does the video script demonstrate the use of light ray rules for image formation with a convex lens?
-The script uses the presenter as the object and demonstrates the image formation process by standing in front of a convex lens, applying the light ray rules, and drawing the corresponding ray diagrams to find the image.
What happens when an object is placed beyond the 2F (two times the focal length) of a convex lens?
-When an object is placed beyond 2F of a convex lens, a real, inverted, and diminished image is formed between F2 and 2F.
What is the 'cheating trick' mentioned in the script for drawing ray diagrams of a convex lens?
-The 'cheating trick' is to first draw the image based on its known properties and then draw the rays that would form such an image, which helps avoid errors in the ray diagram.
What are the three light ray rules for a concave lens?
-The three light ray rules for a concave lens are: 1) A ray parallel to the principal axis appears to come from the focus after refraction. 2) A ray passing through the optical center goes straight without deviation. 3) A ray directed towards the focus becomes parallel to the principal axis after refraction.
What is the nature of the image formed by a concave lens regardless of the object's position?
-The image formed by a concave lens is always virtual, upright, and diminished, regardless of the object's position relative to the lens.
What is the practical application of a convex lens when the object is placed between the optical center and the focus?
-When the object is placed between the optical center and the focus of a convex lens, it forms a magnified, virtual, and erect image, which is the principle behind a magnifying glass.
How does the video script suggest practicing the concept of image formation by spherical lenses?
-The script suggests practicing by solving the top three questions provided at the end of the script and encourages viewers to attempt drawing the ray diagrams themselves.
What resources does the video script recommend for further learning on the topic?
-The script recommends visiting the website monitoracademy.com, subscribing to the presenter's YouTube channel, and following their Facebook page for more science and math videos.
Outlines
🔎 Introduction to Image Formation with Spherical Lenses
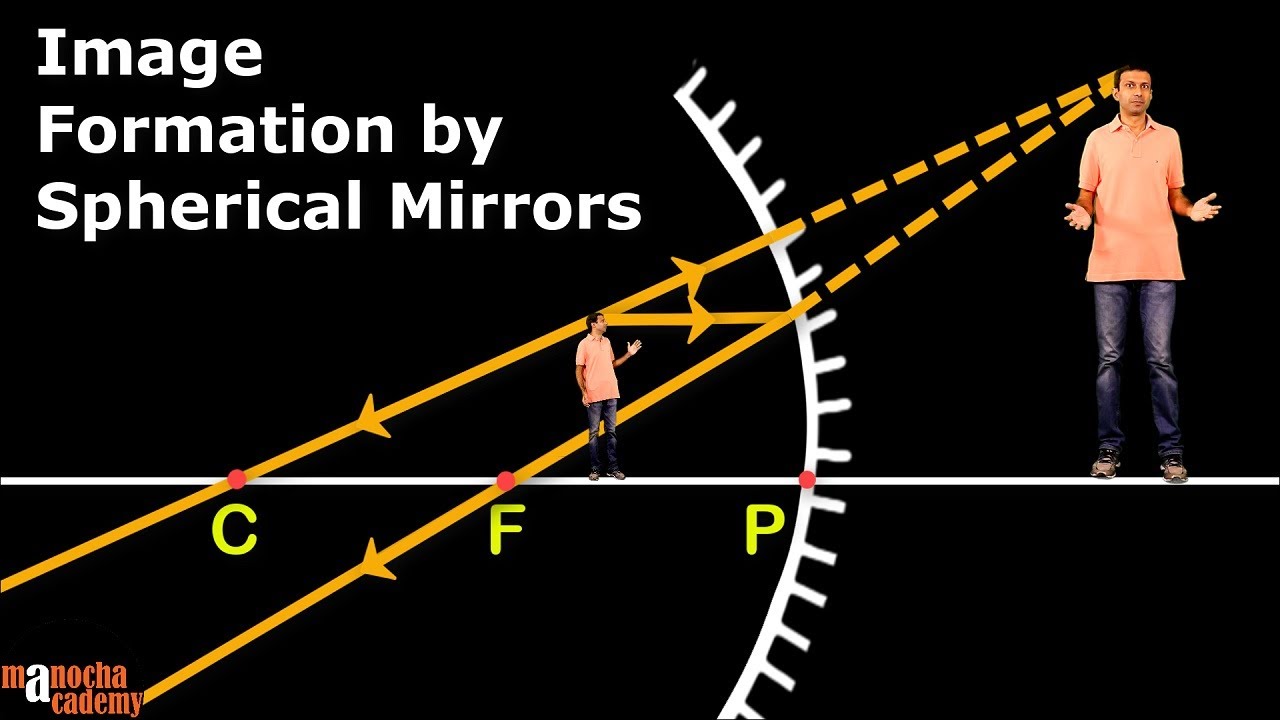
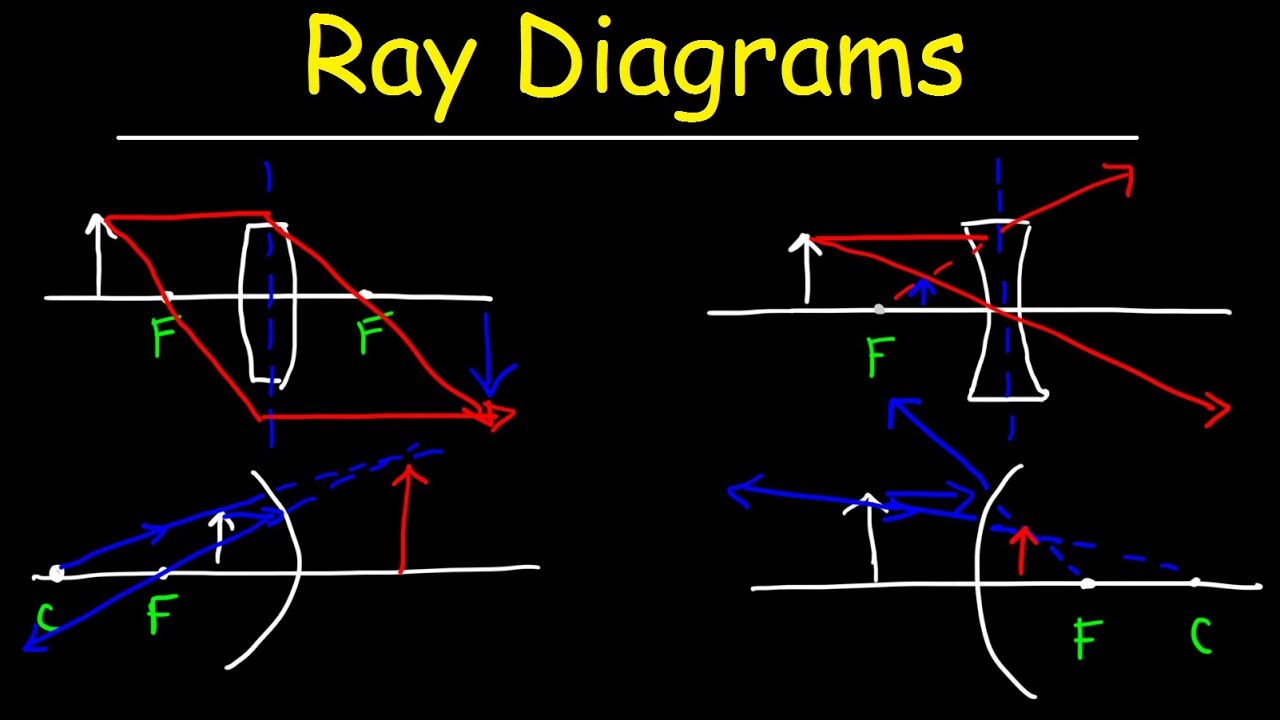
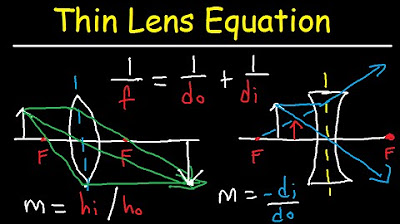
This paragraph introduces the concept of image formation using spherical lenses, specifically convex and concave lenses. The speaker, acting as an object, demonstrates the process of standing in front of these lenses to observe image formation. The video aims to simplify the topic using light ray rules similar to those used for spherical mirrors. It encourages viewers to pause and practice drawing ray diagrams to understand the principles better. The convex lens is described as a converging lens, and a simple trick for drawing it accurately is shared, including marking the principal axis, optical center, and principal foci.
📚 Rules for Image Formation with a Convex Lens
The paragraph explains the three rules for image formation with a convex lens. Rule one states that a parallel ray to the principal axis will pass through the focus after refraction. Rule two indicates that a ray passing through the optical center will continue undeviated. Rule three is the opposite of rule one, stating that a ray passing through the focus will become parallel to the principal axis after refraction. The speaker applies these rules to different scenarios, such as standing beyond two focal lengths (2F), at 2F1, between f1 and 2f1, at the focus, and between the optical center and the focus, detailing the properties of the image in each case, including its position, size, and orientation.
🕵️♂️ Applying the Convex Lens Rules with a Real Object
The speaker uses themselves as an object to demonstrate the application of the convex lens rules. They move to different positions relative to the lens and describe the changes in the image's properties accordingly. For instance, standing beyond 2F results in a real, inverted, and diminished image between f2 and 2F2. At 2F1, the image is real, inverted, and the same size as the object, formed at 2F2. Between f1 and 2f1, the image is real, inverted, and magnified, formed beyond 2F2. At the focus, no image is formed as the rays remain parallel. Between the optical center and the focus, the image is virtual, erect, magnified, and formed behind the object, which is a principle used in magnifying glasses.
🌌 Image Formation with a Concave Lens and Summary
This paragraph discusses image formation with a concave lens, which is a diverging lens. The rules for a concave lens are similar to those of a convex lens but with the refracted rays appearing to diverge from the focus instead. The speaker, again acting as the object, demonstrates the image formation process with a concave lens. Regardless of the object's position, the concave lens always forms a virtual, upright, and diminished image between the object and the lens. The video concludes with an invitation for viewers to answer the top three questions on the topic, to practice and perfect their understanding. The speaker also promotes their website and YouTube channel for more educational content.
Mindmap
Keywords
💡Convex Lens
💡Image Formation
💡Principal Axis
💡Optical Center
💡Focal Length
💡Ray Diagram
💡Reversibility of Light
💡Real Image
💡Virtual Image
💡Magnification
💡Concave Lens
Highlights
Introduction of the experiment with a person standing in front of convex and concave lenses to demonstrate image formation.
Explanation of light ray rules for spherical mirrors and their application in drawing ray diagrams.
Demonstration of accurately drawing a convex lens and marking the principal axis, optical center, and foci.
Description of three rules for image formation with a convex lens and their application in ray diagrams.
Illustration of the reversibility of light in the context of convex lens rules.
Practical demonstration of standing in front of a convex lens and finding the position and properties of the image formed.
Case study of image formation when the object is beyond 2F (two times the focal length) of a convex lens.
Analysis of image properties such as real, inverted, magnified, diminished, and position relative to the lens.
Use of a 'cheating trick' for drawing ray diagrams when the object is at 2F1 (two times the focal length from the first focus).
Exploration of image formation when the object is between F1 and 2F1, resulting in a real, inverted, and magnified image.
Discussion on the unique case of an object at the focus of a convex lens, leading to a highly magnified image at infinity.
Experiment showing a magnified virtual image when the object is between the optical center and the focus of a convex lens.
Introduction of the concave lens and its diverging properties in image formation.
Demonstration of accurately drawing a concave lens and marking the principal axis and foci.
Description of three rules for image formation with a concave lens and their application in ray diagrams.
Practical demonstration of standing in front of a concave lens and finding the position and properties of the image formed.
Consistent properties of the virtual, upright, and diminished image formed by a concave lens regardless of object placement.
Invitation to engage with the presenter's website and YouTube channel for more educational content.
Transcripts
Browse More Related Video


5.0 / 5 (0 votes)
Thanks for rating: