Concave Mirrors and Convex Mirrors Ray Diagram - Equations / Formulas & Practice Problems
TLDRThis educational video script delves into the principles of concave and convex mirrors, explaining the significance of the principal axis, focal points, and radius of curvature. It clarifies the concept of focal length and its relation to the radius of curvature. The script guides viewers through the process of determining whether an image is real or virtual, upright or inverted, and its size relative to the object, using the mirror equation and magnification formula. Practical examples and ray diagrams illustrate the formation of images under various object placements, providing a comprehensive understanding of mirror optics.
Takeaways
- 🔍 The principal axis is a horizontal line that passes through the center of the mirror and is used as a reference for mirror properties.
- 🔦 Both concave and convex mirrors have a focal point, which is the point where light rays converge or appear to diverge from.
- 📏 The radius of curvature is the distance from the mirror's center to the center of curvature, and the focal length is half of the radius of curvature.
- 🔄 The orientation of the mirror determines the front and back sides, which is important for placing objects and interpreting image formation.
- 🔴 The object distance (do) is positive when the object is in front of the mirror, indicating a real object, and negative if the object were hypothetically behind the mirror, indicating a virtual object.
- 🔵 The image distance (di) is positive when the image is in front of the mirror, resulting in a real image, and negative when the image is behind the mirror, resulting in a virtual image.
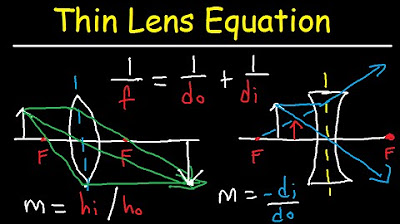
- 📐 The mirror equation \( \frac{1}{F} = \frac{1}{do} + \frac{1}{di} \) relates the focal length to the object and image distances.
- 🔄 Magnification is the ratio of the image height to the object height and is also given by \( M = -\frac{di}{do} \), indicating the orientation and size of the image relative to the object.
- 🌐 For concave mirrors, the focal length is positive, and for convex mirrors, it is negative, which affects how the mirror equation is applied.
- 📈 The magnification value indicates whether the image is upright or inverted, and its absolute value indicates if the image is enlarged or reduced.
- 📝 Through examples, the script demonstrates how to use the mirror equation and magnification to determine the location, size, and orientation of the image formed by a mirror.
Q & A
What is the principal axis in the context of mirrors?
-The principal axis is the horizontal line that passes through the center of the mirror and is used as a reference for the orientation and positioning of the mirror and the object.
What is the focal point of a mirror?
-The focal point is a point on the principal axis where light rays parallel to the principal axis converge after reflecting off a concave mirror or appear to diverge from before striking a convex mirror.
What is the radius of curvature of a mirror?
-The radius of curvature is the distance between the center of curvature of the mirror and the mirror surface itself, effectively the radius of the circular outline that the mirror would have if extended into a full circle.
How is the focal length of a mirror related to its radius of curvature?
-The focal length of a mirror is half the radius of curvature. This relationship is fundamental in mirror optics and is used in the mirror equation.
What is the difference between a real and a virtual object in mirror optics?
-A real object is placed in front of the mirror (do is positive), while a virtual object would be considered to be behind the mirror (do is negative). Real objects produce real images, whereas virtual objects produce virtual images.
What does it mean for an image to be real or virtual in the context of mirrors?
-A real image is formed where light rays actually converge, creating a visible image on a screen. A virtual image, however, is formed where the extensions of the reflected rays appear to meet, and it cannot be projected onto a screen.
What is the mirror equation, and what does it represent?
-The mirror equation is 1/F = 1/do + 1/di, where F is the focal length, do is the object distance, and di is the image distance. It relates the distances involved in the formation of an image by a mirror.
What is the magnification equation, and how does it relate to the image formed by a mirror?
-The magnification equation is M = -di/do or M = hi/ho, where M is the magnification, di is the image distance, do is the object distance, hi is the image height, and ho is the object height. It represents the ratio of the size of the image to the size of the object and indicates whether the image is upright or inverted, enlarged or reduced.
How can you determine if an image formed by a mirror is upright or inverted?
-An image is upright if the magnification (M) is positive, meaning the image is in the same orientation as the object. If M is negative, the image is inverted, meaning it is upside down relative to the object.
What happens to the size of the image when the magnification is greater than or less than 1?
-If the magnification is greater than 1, the image is enlarged, meaning it is taller than the object. If the magnification is less than 1, the image is reduced, meaning it is shorter than the object.
Can you provide an example of how to use the mirror equation to find the image distance for a concave mirror with a given focal length and object distance?
-Yes, for a concave mirror with a focal length F and an object distance do, you can use the mirror equation 1/F = 1/do + 1/di to solve for di. For example, if F = 8 cm and do = 24 cm, you would rearrange and solve the equation to find di = 12 cm, indicating a real image formed in front of the mirror.
What is the significance of the center of curvature in mirror optics?
-The center of curvature is the point from which the radius of curvature is measured. It is important because it helps determine the position of the focal point and is used in understanding the behavior of light rays reflecting off the mirror.
How does the position of the object relative to the focal point affect the nature of the image formed by a concave mirror?
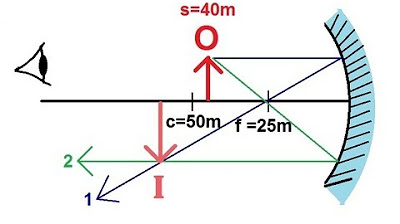
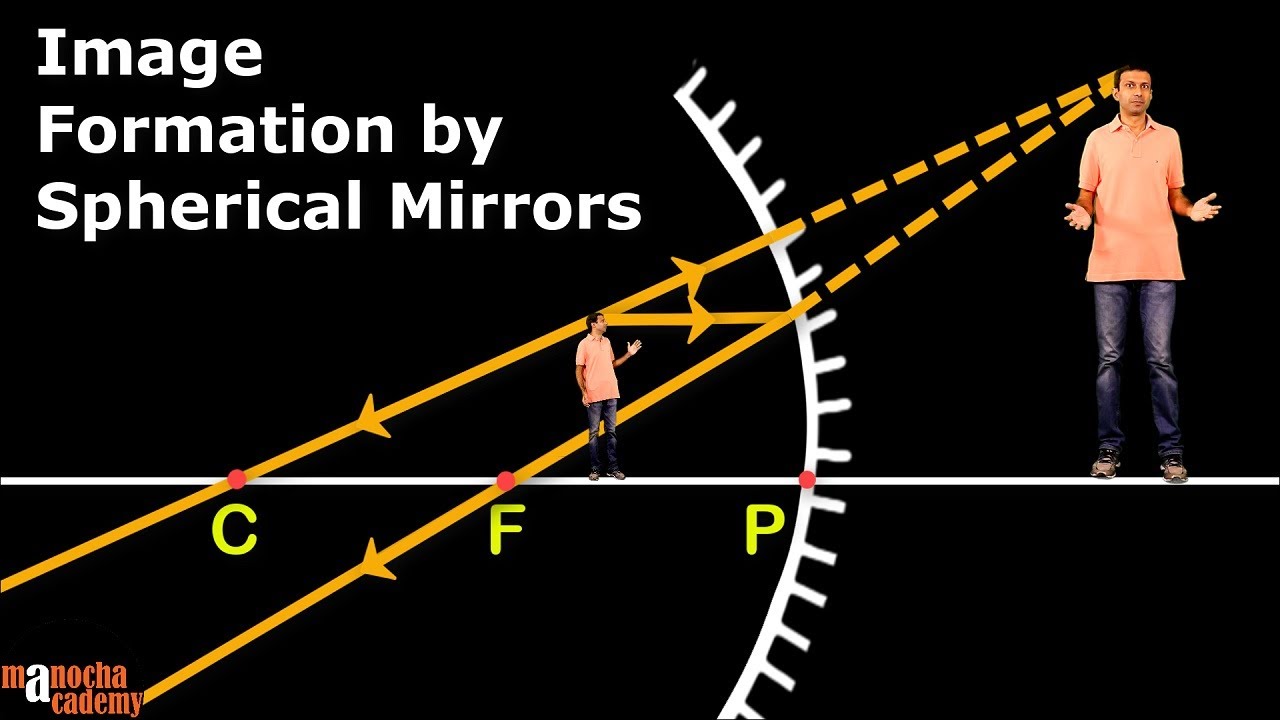
-If the object is placed beyond the center of curvature (do > 2F), a real, inverted, and reduced image is formed. If the object is at the center of curvature (do = 2F), a real, inverted, and same-sized image is formed. If the object is between the center and the focal point (F < do < 2F), a real, inverted, and enlarged image is formed. If the object is at the focal point (do = F), no image is formed. If the object is between the focal point and the mirror (do < F), a virtual, upright, and enlarged image is formed.
Outlines
🔍 Understanding Concave and Convex Mirrors
This paragraph introduces the concepts of concave and convex mirrors, explaining the principal axis, focal point, center of curvature, and radius of curvature. It clarifies the focal length as half of the radius of curvature and distinguishes between real and virtual objects based on their position relative to the mirror. The paragraph also explains the difference between real and virtual images based on the distance of the image (di) from the mirror and the sign conventions associated with object distance (do) and image distance (di). The lens formula and magnification equation are introduced, which are essential for solving mirror-related problems.
📐 Analyzing Image Formation with Concave Mirrors
The second paragraph delves into the specifics of image formation using concave mirrors. It uses an example with a given focal length and object distance to demonstrate the calculation of image distance (di) and magnification. The process involves solving the lens equation and interpreting the results to determine whether the image is real or virtual, upright or inverted, and its size relative to the object. The paragraph also explains how to draw a ray diagram to visualize the image formation and confirms the results with a practical example, including the calculation of the image height.
🔄 Exploring Different Object Positions with Concave Mirrors
This paragraph explores the effects of placing an object at various positions relative to the concave mirror's focal point and center of curvature. It discusses the types of images formed when the object is beyond the center of curvature, at the center, and between the center and the focal point. The paragraph illustrates how the image changes from real and inverted to the same size as the object, and then to an enlarged virtual image as the object's position changes. The importance of understanding the relationship between the object's position and the nature of the image is emphasized.
🚫 Object Placement at the Focal Point and Between Focal Point and Mirror
The fourth paragraph addresses the scenarios of placing an object exactly at the focal point and between the focal point and the mirror of a concave mirror. It explains that no image is formed when the object is at the focal point, as the light rays do not converge to form an image. When the object is placed between the focal point and the mirror, a virtual, upright, and enlarged image is formed behind the mirror. The paragraph also discusses the implications of these placements on image formation and the use of ray diagrams to visualize the outcomes.
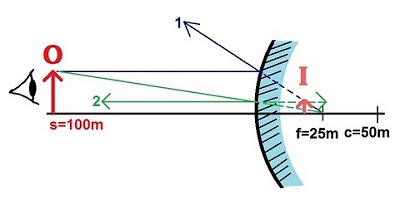
🔄 Image Formation with Convex Mirrors
The final paragraph shifts the focus to convex mirrors, contrasting them with concave mirrors. It uses an example with a given focal length and object distance to calculate the image distance and magnification for a convex mirror. The paragraph explains that a convex mirror produces a virtual, upright, and reduced image when the object is placed in front of it. It also demonstrates how to draw a ray diagram for a convex mirror and emphasizes the importance of understanding the focal length's sign and its impact on image formation.
Mindmap
Keywords
💡Concave Mirror
💡Convex Mirror
💡Principal Axis
💡Focal Point
💡Focal Length
💡Radius of Curvature
💡Real Image
💡Virtual Image
💡Magnification
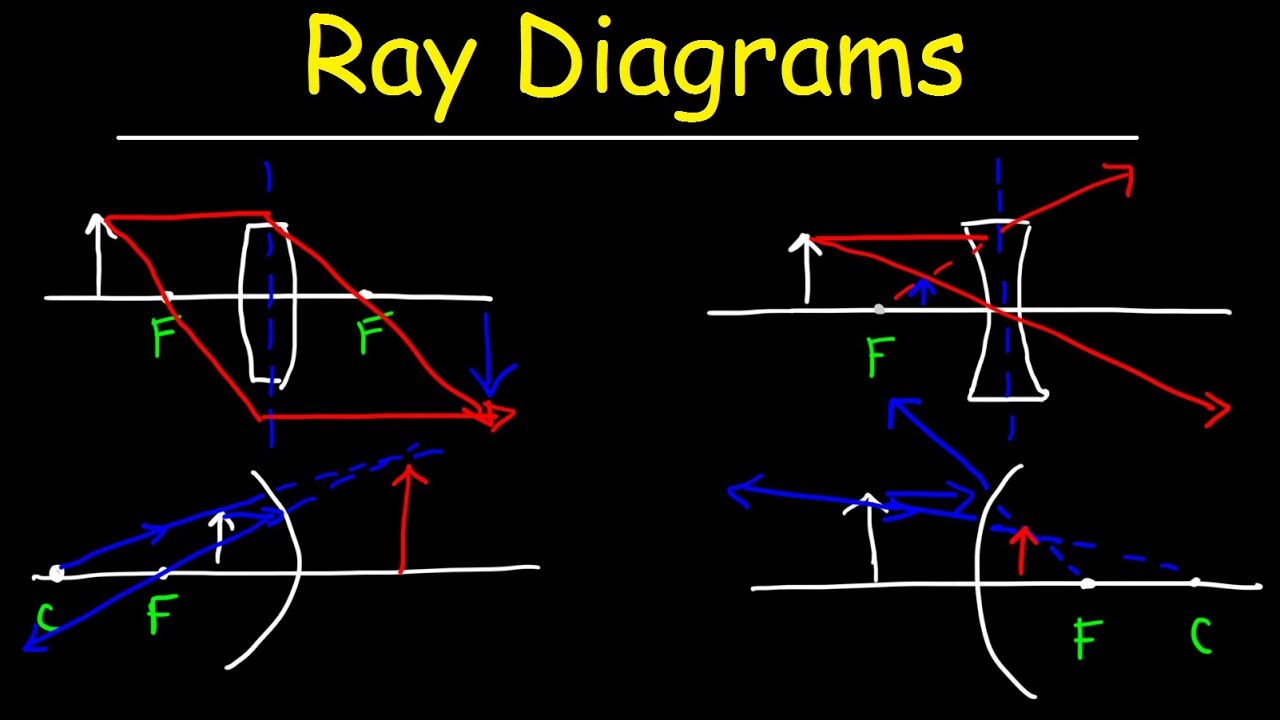
💡Ray Diagram
💡Sign Conventions
Highlights
Introduction to concave and convex mirrors, including the principal axis and focal point.
Explanation of the radius of curvature and its relation to the focal length.
Sign conventions for object distance (do) and image distance (di) in mirror imaging.
The significance of the object's position relative to the mirror in determining real or virtual images.
Focal length's role in differentiating between concave and convex mirrors.
The lens equation relating focal length, object distance, and image distance.
Magnification equation and its implications for image orientation and size.
How the magnification value indicates whether an image is upright, inverted, enlarged, or reduced.
A step-by-step problem-solving approach using the lens equation for a concave mirror.
Ray diagram construction to visualize image formation by a concave mirror.
Behavior of image formation when the object is at the center of curvature.
The effect of placing the object between the center and the focal point on image size and orientation.
Special case analysis when the object is placed at the focal point and the resulting image characteristics.
Conditions leading to the formation of a virtual image when the object is within the focal point and mirror.
Differentiating between real and virtual images using ray diagrams and the lens equation.
Application of the problem-solving method to a convex mirror with a given focal length and object distance.
Ray diagram for a convex mirror illustrating the formation of an upright, reduced virtual image.
Summary of key details for determining image characteristics without a diagram, using equations and focal length signs.
Transcripts

5.0 / 5 (0 votes)
Thanks for rating: