Free body diagrams: Grade 11 and 12 Physics
TLDRThis video is essential for Grade 11 and 12 students aiming to excel in Physics, specifically in understanding Newton's Laws. It explains the importance of drawing free body diagrams correctly to secure easy marks and set up equations for Newton's first and second laws. The video differentiates between force diagrams and free body diagrams, providing detailed instructions on how to draw free body diagrams for various scenarios, including objects on slopes and connected objects. It emphasizes accuracy in drawing and labeling forces to avoid losing marks and demonstrates how these diagrams aid in solving Newton's Law problems.
Takeaways
- 📚 Free body diagrams are crucial for success in Physics exams, especially in grades 11 and 12 Newton's Laws.
- 🎯 Drawing free body diagrams correctly can earn easy marks and is essential for setting up equations for Newton's laws.
- 📝 The importance of free body diagrams is twofold: they are easy marks and they help in solving Newton's Laws questions.
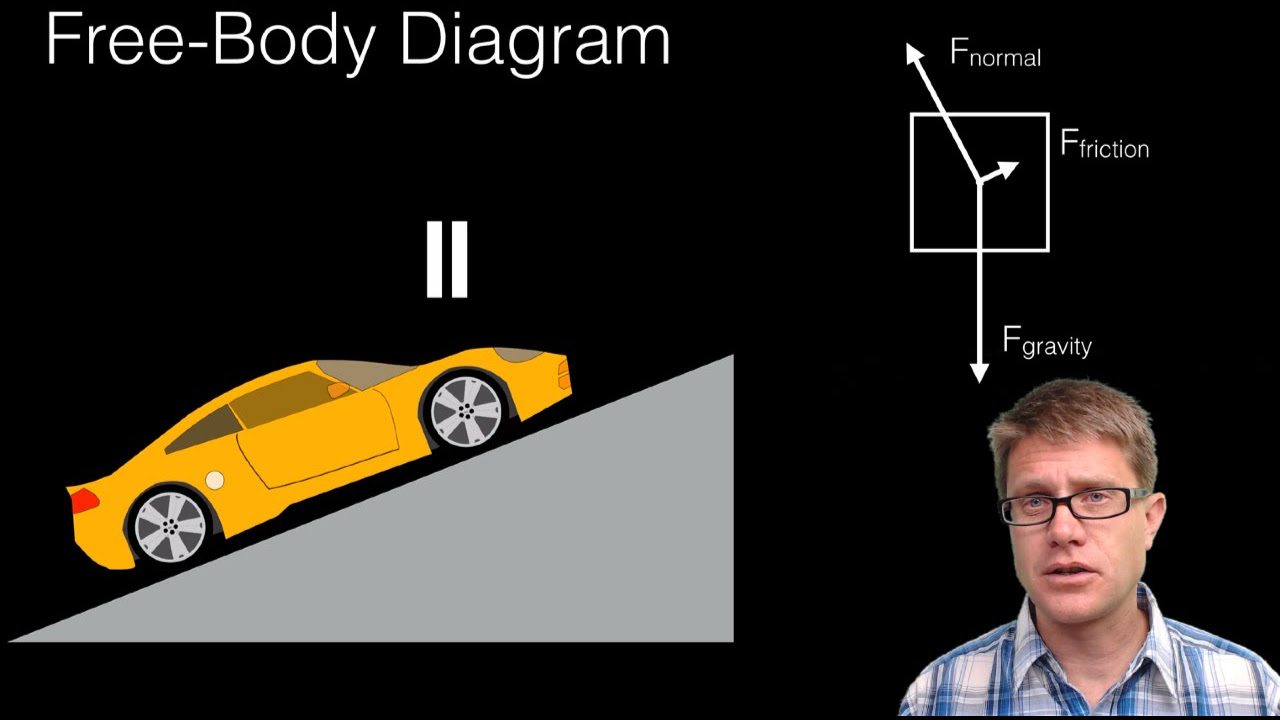
- 📌 Both force diagrams and free body diagrams represent forces with arrows, but free body diagrams use a dot to represent the object with all forces pointing away from it.
- 🔍 When drawing free body diagrams, the object is represented as a dot, and forces are indicated with arrows pointing away from the dot.
- ✏️ Always label the forces in your diagrams, including the force of gravity (FG or W), normal force (FN), and any applied forces (e.g., F applied).
- 📉 Avoid losing marks by not forgetting arrowheads and by ensuring the relative magnitudes of forces are represented by the length of the arrows.
- 🚫 Do not include extra forces or break forces into components when drawing diagrams for exam marks; this can lead to deduction of marks.
- 🔄 However, for calculations, it's helpful to resolve forces into components on a rough free body diagram to assist with Newton's Laws questions.
- 📐 When dealing with inclined planes, remember that the normal force acts 90° to the surface, and friction acts opposite to the direction of motion.
- 🔄 For connected objects, two separate free body diagrams are needed, showing the tension force in opposite directions for each object.
- 📝 When solving problems, use the components of forces parallel to the slope for forces acting in the direction of motion, and perpendicular for forces acting into the slope.
Q & A
Why are free body diagrams important for students in grade 11 and 12 physics?
-Free body diagrams are crucial for students in grade 11 and 12 physics because they help in setting up equations for Newton's laws, which are fundamental to solving physics problems. They also represent easy marks in exams that students cannot afford to lose.
What is the importance of practicing problem-solving in physics?
-Practicing problem-solving in physics helps students understand concepts deeply and apply them to various situations, which is essential for mastering the subject and performing well in exams.
Outlines
🎓 Understanding the Importance of Free Body Diagrams
This video is crucial for students in grades 11 and 12 who want to excel in Newton's Laws. It emphasizes the importance of mastering free body diagrams, which are vital for success in Physics exams. The video explains that free body diagrams are often easy marks in exams and are essential for setting up equations for Newton's laws.
✍️ Drawing Free Body Diagrams Correctly
The video instructs on how to draw free body diagrams properly, avoiding common mistakes such as missing arrowheads or adding unnecessary components. It stresses the importance of accuracy in representing forces with vectors and how correctly drawn diagrams can aid in solving Newton's Laws equations.
📐 Converting Force Diagrams to Free Body Diagrams
This section explains the difference between force diagrams and free body diagrams, highlighting that objects in free body diagrams are represented as dots with forces acting away from them. It provides step-by-step instructions on transforming force diagrams into free body diagrams, ensuring correct representation of forces.
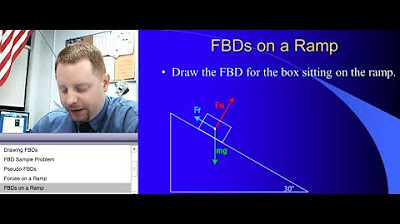
🖍️ Tips for Accurate Free Body Diagrams on Slopes
The video offers tips for drawing free body diagrams for objects on slopes, a common challenge for students. It recommends drawing the slope in pencil first to ensure accurate representation of forces, such as the normal force acting perpendicular to the surface and frictional forces parallel to the slope.
🔍 Solving Complex Free Body Diagram Problems
This segment deals with more complex scenarios, such as objects connected by ropes. It explains how to draw separate free body diagrams for each object, showing the forces acting on them, including tension and friction. The video underscores the importance of understanding the direction and relative magnitude of forces.
🧩 Integrating Free Body Diagrams into Newton’s Laws Calculations
The final part of the video demonstrates how to use free body diagrams in Newton's Laws calculations. It highlights the necessity of resolving forces into components for accurate calculations and provides examples of how to apply these principles to solve for unknown forces.
📢 Conclusion and Next Steps
The video concludes by reiterating the importance of mastering free body diagrams for success in Physics exams. It encourages viewers to share the video, comment on what topics they want to see next, and stay tuned for future videos that will build on these foundational skills.
Mindmap
Keywords
💡Free Body Diagram
💡Newton's Laws
💡Force Diagram
💡Vectors
💡Mark Allocation
💡Components
💡Normal Force
💡Friction
💡Tension
💡Inclined Plane
Highlights
A video guide on drawing free body diagrams for physics students in grades 11 and 12.
Free body diagrams are essential for Newton's Laws and can be worth up to five marks in exams.
Correctly drawn free body diagrams help set up equations for Newton's Laws.
The importance of distinguishing between Force diagrams and free body diagrams.
Force diagrams represent objects as actual objects, while free body diagrams use a dot.
Force vectors are represented by arrows with length indicating magnitude and direction shown by arrowheads.
A tip to avoid losing marks: always include arrowheads and labels on vectors.
Understanding the mark allocations for free body diagrams to know how many forces to draw.
Avoid drawing extra forces or breaking them into components for exam marks.
A demonstration of transforming a force diagram into a free body diagram.
How to correctly represent forces acting on objects at angles and on slopes.
Drawing the slope in pencil can help visualize forces on inclined surfaces.
The normal force always acts 90° relative to the surface, not straight up.
When resolving forces for calculations, it's helpful to break them into components, but not for exam diagrams.
An example of how to handle forces when two objects are connected by a rope or string.
Tension in a rope acts in opposite directions on connected objects but is the same force.
The necessity of drawing two separate free body diagrams for two connected objects.
A final reminder of the importance of free body diagrams for solving Newton's Laws problems.
Transcripts
Browse More Related Video
High School Physics - Ramps and Inclines

2022 Live Review 2 | AP Physics 1 | Understanding Forces and Newton’s Laws

College Physics 1: Lecture 21 - Solving Circular Dynamics Problems

2021 Live Review 8 | AP Physics C: Mechanics | Understanding Resistive Forces
Free-Body Diagrams

AP® Physics 1: Forces and Newton's Laws (Unit 2)
5.0 / 5 (0 votes)
Thanks for rating: