Physics - Optics: Lenses (2 of 5) Lens Combinations - Two Converging Lenses
TLDRThis educational video script explains the concept of image formation in a lens system with two lenses. The demonstration begins with an object placed within the focal length of the first lens, resulting in a virtual image. The script then uses equations to calculate the location and size of the first image. The first image acts as the object for the second lens, leading to the formation of a real, inverted image at a specific distance. The script concludes by determining the final image size and orientation relative to the original object, illustrating the principles of lens combinations in optical systems.
Takeaways
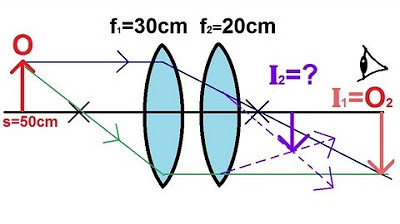
- 🔍 The script discusses a lens combination experiment with two lenses, where the object is placed inside the focal length of the first lens, resulting in a virtual image.
- 📐 The first lens is used with rays drawn parallel to the normal and through the focal point, illustrating how rays diverge and form a virtual image.
- 🤔 The observer's brain forms an image based on the apparent paths of the rays, even though the rays do not physically converge to a real point.
- 📈 The script provides an equation to calculate the location of the first image using the object distance and the focal length of the first lens.
- 🔢 The calculation shows that the first image is formed at the focal point of the first lens, confirming it is a virtual image with a magnification of 2.
- 👆 The magnification of the first image is positive, indicating the image is upright and twice the size of the object.
- 🔄 The first image then becomes the object for the second lens, and the script explains how to calculate the new object distance for the second lens.
- 📐 The second lens is used to find the second image, with the script detailing the process of using the magnification equation to determine the image's characteristics.
- 🔢 The second image is calculated to be real, inverted, and of the same size as the first image, located 40 cm behind the second lens.
- 🔄 The final step is to determine the size of the second image relative to the original object by multiplying the magnifications of both lenses.
- 📊 The final image is found to be twice the size of the original object and inverted, providing a comprehensive understanding of the double lens system.
Q & A
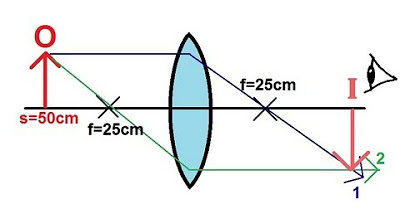
What is the main difference between the two lens combinations described in the script?
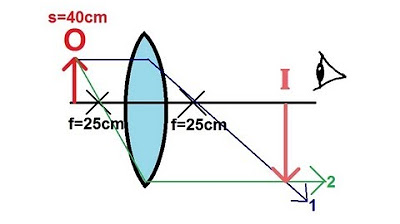
-The main difference is the placement of the object relative to the first lens. In the second combination, the object is placed inside the focal point of the first lens, resulting in a virtual image instead of a real image as in the first combination.
Why does placing the object inside the focal point of the first lens result in a virtual image?
-When an object is placed inside the focal point, the rays of light after passing through the lens diverge rather than converging, which means they appear to come from a point behind the lens, creating a virtual image.
How does the observer's brain interpret the diverging rays from the lens to form an image?
-The observer's brain interprets the diverging rays as if they were coming from a point behind the lens, thus forming a virtual image at that location.
What is the formula used to calculate the location of the first image (image one)?
-The formula used is \( S_1' = \frac{S_1 \cdot f_1}{S_1 - f_1} \), where \( S_1 \) is the object distance, and \( f_1 \) is the focal length of the first lens.
What does the negative value of the image distance indicate about the image formed by the first lens?
-A negative image distance indicates that the image is virtual, meaning it is formed on the same side of the lens as the object.
What is the magnification of the first image (M1), and what does its sign and value tell us about the image?
-The magnification \( M_1 \) is 2, which means the image is twice the size of the object. The positive sign indicates that the image is upright relative to the object.
How does the image formed by the first lens become the object for the second lens?
-The image formed by the first lens (image one) is positioned in front of the second lens, making it the new object for the second lens to form a new image.
What is the formula used to calculate the location of the second image (image two)?
-The formula used is \( S_2' = \frac{S_2 \cdot f_2}{S_2 - f_2} \), where \( S_2 \) is the new object distance (the distance from the first image to the second lens), and \( f_2 \) is the focal length of the second lens.
What does the positive value of the second image distance indicate about the image formed by the second lens?
-A positive image distance indicates that the image is real, meaning it is formed on the opposite side of the lens from the object.
What is the magnification of the second image (M2), and what does its sign and value tell us about the image?
-The magnification \( M_2 \) is -1, which means the image is the same size as the first image. The negative sign indicates that the image is inverted relative to the first image.
How do you determine the final size and orientation of the image relative to the original object?
-You multiply the magnifications of the two images, \( M_1 \times M_2 \). The result gives you the final image size relative to the original object and its orientation.
Outlines
🔎 Lens Combination Analysis with Virtual Image Formation
This paragraph discusses a lens combination experiment where an object is placed within the focal point of the first lens, resulting in a virtual image. The speaker explains the process of drawing a ray diagram for the first lens, identifying that rays parallel to the normal converge at the focal point and continue in a manner that suggests a virtual image formation. The observer's brain interprets these rays as if they originated from a point in front of the lens, creating a virtual image. Mathematical equations are used to calculate the location and size of this first image, revealing it to be upright and twice the size of the object. The paragraph concludes with the setup for finding the image formed by the second lens, with the first image now serving as the object for the second lens.
📐 Calculating Image Magnification and Orientation in a Double Lens System
The second paragraph delves into the process of determining the second image in a double lens system when the object is placed inside the focal length of the first lens. The image formed by the first lens becomes the object for the second lens, and the distance from this new object to the second lens is calculated. Using the lens equation, the location of the second image is found to be 40 cm behind the second lens, indicating a real image. The magnification is calculated, revealing that the second image is the same size as the first but inverted. The final step is to determine the size and orientation of the final image relative to the original object by multiplying the magnifications of the two lenses. The result shows that the final image is twice the size of the original object and inverted.
Mindmap
Keywords
💡Lens
💡Focal Point
💡Object Distance
💡Virtual Image
💡Ray Diagram
💡Magnification
💡Real Image
💡Upright and Inverted
💡Combination of Lenses
💡Image Distance
Highlights
Introduction of a lens combination experiment using the same lenses as in the first example.
Placement of the object inside the focal point of the first lens to create a virtual image.
Explanation of the ray diagram for the first lens with the object placed differently.
Ray number one and two do not converge to form a real image, but the observer's brain forms a virtual image.
Use of lens equations to find the location and size of the first image.
Calculation of the first image's position and confirmation that it is virtual.
Determination of the magnification of the first image, which is twice the size of the object and upright.
Transition to finding the image formed by the second lens with the first image as the new object.
Calculation of the new object distance for the second lens.
Use of the lens equation for the second lens to find the second image's position.
Determination of the second image's orientation as inverted relative to the first image.
Identification of the second image as a real image due to its positive image distance.
Calculation of the final image size relative to the original object by multiplying the magnifications of both lenses.
Conclusion that the final image is twice the size of the original object and inverted.
Demonstration of the process for finding the first and second images in a double-ended lens system.
Emphasis on the importance of understanding the virtual and real images in lens combinations.
Practical application of lens equations in determining image properties in optical systems.
Transcripts
Browse More Related Video

Multiple Two Lens System with Diverging and Converging Lens
Physics - Optics: Lenses (1 of 5) Lens Combinations - Two Converging Lenses
Physics - Optics: Lenses (2 of 4) Converging Lens

Physics - Optics: Lenses (4 of 5) Lens Combinations - Converging & Diverging Lenses

Physics - Optics: Lenses (1 of 4) Converging Lens
Physics - Optics: Lenses (3 of 4) Converging Lens
5.0 / 5 (0 votes)
Thanks for rating: