Physics - Optics: Lenses (2 of 4) Converging Lens
TLDRThis script discusses the behavior of a converging lens with a focal length of 25 cm. It explains the use of ray diagrams to determine the image formation when an object is placed at twice the focal distance, resulting in an image that is real, inverted, and of the same size as the object. The script also emphasizes the importance of understanding how image formation changes as the object is moved closer to the lens, hinting at further exploration of lens applications.
Takeaways
- 🔍 The script discusses the use of thin lenses and their equations for refraction, noting that thick lenses would require more complex calculations.
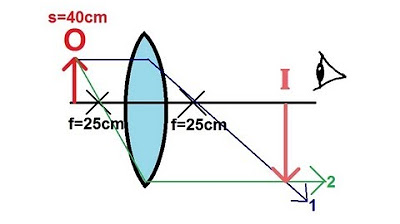
- 🌀 A converging lens with a focal length of 25 cm is introduced, emphasizing that the focal length is positive for a converging lens.
- 📏 The object is placed at twice the focal distance (50 cm) from the lens, which is a key setup for the demonstration.
- 📐 The script uses a ray diagram to illustrate how the image is formed by the refraction of light through the lens.
- 👀 Ray one is parallel to the normal and refracts through the focal point on the other side of the lens.
- 🔄 Ray two is drawn through the focal point in front of the lens and refracts to become parallel to the normal after passing through the lens.
- 🤔 The image is found where the two rays meet, and it appears at the same distance from the lens as the object was.
- 📉 The lens formula \( S' = \frac{SF}{S - F} \) is used to calculate the image distance, confirming it to be 50 cm behind the lens.
- 🔄 The image is real, as indicated by the rays converging behind the lens, and it is inverted and the same size as the object.
- 🔄 The magnification is calculated as \( m = -\frac{S'}{S} \), resulting in a magnification of -1, meaning the image is the same size but inverted.
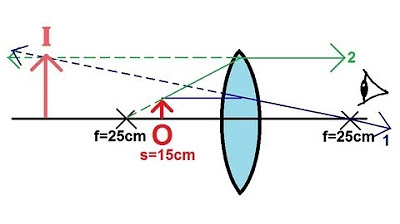
- 🔍 The script hints at future examples involving moving the object closer to the lens to observe different outcomes.
Q & A
What type of lens is being discussed in the script?
-The script discusses a converging lens, which is also known as a convex lens.
Why are thin lenses considered in this example?
-Thin lenses are considered because the equations used for lens calculations are valid for thin lenses, while thick lenses require more complex equations.
What is the focal length of the converging lens mentioned in the script?
-The focal length of the converging lens is 25 cm.
What is the significance of placing the object at twice the focal distance from the lens?
-Placing the object at twice the focal distance from the lens results in the image forming at the same distance on the other side of the lens, with the same size but inverted.
How is the image formed when the object is placed at 50 cm from the lens?
-The image is formed by the intersection of two rays: one parallel to the normal that refracts through the focal point, and the other passing through the focal point on the lens side that refracts parallel to the normal on the other side.
What is the formula used to calculate the image distance (S') in this script?
-The formula used is S' = (S * F) / (S - F), where S is the object distance, F is the focal length, and S' is the image distance.
What is the calculated image distance when the object is 50 cm away from the lens?
-The calculated image distance is also 50 cm, which is the same as the object distance.
What does the positive value of the image distance indicate about the image formed?
-A positive value of the image distance indicates that the image is real and forms on the opposite side of the lens from the object.
How is the magnification (m) calculated in this example?
-The magnification is calculated using the formula m = -S' / S, where S' is the image distance and S is the object distance.
What does the magnification of -1 signify about the image?
-A magnification of -1 signifies that the image is the same size as the object but is inverted.
What happens when the object is moved closer to the lens in future examples?
-The script suggests that moving the object closer to the lens will result in different image distances and magnifications, which will be explored in future examples.
Outlines
🔎 Lens Optics and Ray Tracing
This paragraph discusses the optical properties of a converging lens, emphasizing that it is a thin lens and thus subject to specific equations. The focal length of the lens is given as 25 cm, and the lens is used to create an image by placing an object at twice the focal distance, which is 50 cm. A ray diagram is used to demonstrate how the rays of light are refracted through the lens to form an image. The first ray is parallel to the normal and passes through the focal point after refraction, while the second ray passes through the focal point before hitting the lens and continues parallel to the normal after refraction. The intersection of these rays indicates the position of the image.
Mindmap
Keywords
💡Converging lens
💡Focal length
💡Ray diagram
💡Real image
💡Magnification
💡Inverted image
💡Object distance
💡Image distance
💡Lens formula
💡Parallel rays
Highlights
Converging lens example with thin lenses using valid equations
Focal length of 25 cm for the converging lens
Object placed exactly twice the focal distance away (50 cm)
Ray diagram used to determine image location
First ray parallel to normal, refracts through focal point
Second ray through focal point, refracts parallel to normal
Image appears same distance away on opposite side as object
Using lens equation S' = (SF)/(S-F) to find image distance
Image distance (S') calculated to be 50 cm behind lens
Real image formed as rays converge behind lens
Magnification (m) calculated as -S'/S, equals -1
Image same size as object, inverted and upside down
Significance of object distance and focal point relationship
Implications for future applications of lens placement
Demonstration of image formation when object is moved closer
Transcripts
Browse More Related Video
Physics - Optics: Lenses (3 of 4) Converging Lens

Physics - Optics: Lenses (1 of 4) Converging Lens
Physics - Optics: Lenses (4 of 4) Converging Lens

Multiple Two Lens System with Diverging and Converging Lens
Physics - Optics: Lenses (2 of 5) Lens Combinations - Two Converging Lenses
Physics - Optics: Lenses (3 of 5) Lens Combinations - Converging & Diverging Lenses
5.0 / 5 (0 votes)
Thanks for rating: