Physics - Optics: Lenses (3 of 4) Converging Lens
TLDRThis educational video script explores the behavior of a converging lens with a focal length of 25 cm when an object is placed 30 cm away. The script demonstrates the creation of a real, inverted, and enlarged image using the lens formula and explains the concept of magnification. As the object approaches the lens's focal point, the image distance increases, and the image size grows larger. The script also hints at what happens when the object is placed at and inside the focal point, promising further exploration in the next video.
Takeaways
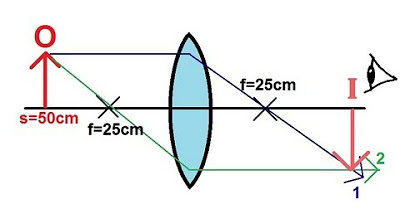
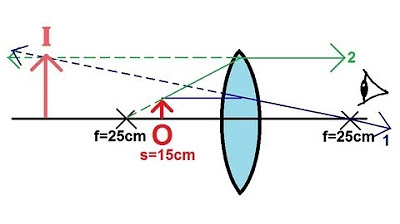
- 🔍 The object is positioned 30 cm from a converging lens with a focal length of 25 cm.
- 📏 Converging lenses have a positive focal length.
- ➡️ The first ray travels from the top of the object to the lens and refracts through the focal point on the other side.
- 🔄 The second ray goes from the top of the object through the focal point to the lens and refracts parallel to the principal axis.
- 🔗 The rays converge on the other side of the lens, creating a real, inverted image.
- 📐 The image distance (S') is calculated using the lens equation: S' = (S * F) / (S - F).
- 💡 The calculation for S' is 30 * 25 / (30 - 25), resulting in 150 cm, meaning the image is 150 cm behind the lens.
- 🔍 The magnification (M) is found using the formula: M = -S' / S. In this case, it's -150 / 30, resulting in a magnification of -5.
- 🔄 A magnification of -5 means the image is five times larger than the object and inverted.
- 🔍 As the object moves closer to the focal point, the image moves farther from the lens and becomes larger.
Q & A
What type of lenses are being discussed in the script?
-The script discusses converging lenses, which have a positive focal length and cause light to converge at a point.
What is the focal length of the lens mentioned in the script?
-The focal length of the lens mentioned in the script is 25 cm.
What happens when an object is placed at a distance of 30 cm from the lens?
-When the object is placed at a distance of 30 cm from the lens, the rays of light refract through the lens and converge to form a real image on the other side.
How is the first ray in the ray diagram defined in the script?
-The first ray in the ray diagram is defined as coming from the top of the object, passing through the lens, and continuing on through the focal point on the other side.
What is the second ray in the ray diagram, and how does it behave?
-The second ray is from the tip of the object to the focal point, then to the lens where it refracts and continues on parallel to the normal, indicating the direction of the refracted ray.
What is the equation used to find the image distance in the script?
-The equation used to find the image distance is \( S' = \frac{SF}{s - F} \), where \( S \) is the object distance, \( S' \) is the image distance, and \( F \) is the focal length of the lens.
What was the calculated image distance when the object was 30 cm away from the lens?
-The calculated image distance was initially stated as -150 cm, but the script corrected this to a positive value, indicating an error in the calculation.
What does a positive image distance indicate about the image formed by the lens?
-A positive image distance indicates that the image is real, formed on the opposite side of the lens from the object, and is inverted.
What is the relationship between the object distance and the image distance as the object gets closer to the lens?
-As the object gets closer to the lens, the image moves farther away from the lens and becomes larger.
What is the formula for calculating magnification in the script?
-The formula for calculating magnification in the script is \( m = -\frac{S'}{s} \), where \( S' \) is the image distance and \( s \) is the object distance.
What does the magnification of -5 mean in the context of the script?
-A magnification of -5 means the image is five times larger than the object and is inverted.
What happens to the image when the object is placed at the focal point of the lens?
-When the object is placed at the focal point, the image will theoretically become infinitely far away and infinitely large, though this is not practically observable.
What will be the subject of the next video in the series?
-The next video will discuss what happens when the object is placed inside the focal point of the lens.
Outlines
🔍 Understanding Converging Lenses: Moving Objects Closer
In this section, we explore the behavior of converging lenses as the object moves closer to the lens. With an object distance of 30 cm and a focal length of 25 cm, we draw a ray diagram. The first ray travels from the top of the object through the lens and continues through the focal point. The second ray moves from the tip of the object to the focal point, then bends and travels parallel to the normal. These rays converge to form a real, inverted image on the other side of the lens. Calculations show the image distance (S') to be 150 cm. Magnification is calculated as -5, indicating the image is five times larger and inverted.
🧮 Calculating Image Distance and Magnification
Using the lens equation S' = SF / (S - F), we find the image distance to be 150 cm behind the lens, confirming it is a real image. An error correction reveals the correct interpretation of the image distance as positive. The magnification is determined to be -5, signifying the image is five times the object's size and inverted. This section emphasizes the relationship between object distance, image distance, and magnification for converging lenses.
📏 Relationship Between Object Distance and Image Formation
As the object moves closer to the focal point, the image moves further away from the lens and becomes larger. When the object reaches the focal point, the image distance becomes infinitely large. This theoretical discussion prepares us for the next scenario where the object is placed inside the focal point, which will be covered in the subsequent video.
Mindmap
Keywords
💡Converging Lens
💡Focal Length
💡Ray Diagram
💡Object Distance (s)
💡Image Distance (S')
💡Real Image
💡Inverted Image
💡Magnification
💡Principal Axis
💡Lens Equation
Highlights
Exploring the behavior of thin converging lenses with positive focal lengths.
Demonstration of how moving an object closer to the lens affects image formation.
Object placed at a distance of 30 cm from a lens with a 25 cm focal length.
Ray diagram illustrating the refraction of light through the lens to form a real image.
Use of lens formula S' = (S * F) / (S - F) to calculate image distance.
Calculation error correction in the lens formula application.
Determination that the image is real and located 150 cm behind the lens.
Observation that as the object approaches the focal point, the image moves farther away and becomes larger.
Introduction of magnification formula m = -S' / S to find the size and orientation of the image.
Calculation of the magnification showing the image is 5 times larger than the object and inverted.
Explanation of the relationship between object distance, image distance, and magnification.
Theoretical prediction of image characteristics when the object is at the focal point.
Anticipation of what happens when the object is placed inside the focal point in the next video.
Teaching the concept of real images formed by converging lenses and their properties.
Visual representation of the movement and size change of the image as the object's distance changes.
Emphasizing the practical applications of lens equations in real-world scenarios.
Engaging the audience with a promise of further exploration in the next video installment.
Transcripts
Browse More Related Video

5.0 / 5 (0 votes)
Thanks for rating: