Physics - Optics: Lenses (4 of 5) Lens Combinations - Converging & Diverging Lenses
TLDRThis script explains a lens combination experiment involving both a converging and a diverging lens. The object is placed 50 cm from the first lens, and using ray diagrams, the script demonstrates how to find the image location and calculate magnification. The first image is real and inverted, with a magnification of -0.67. The second image, formed by the diverging lens, is real, inverted, and magnified 4.5 times. The total magnification is -3, indicating an inverted, three times larger final image compared to the original object.
Takeaways
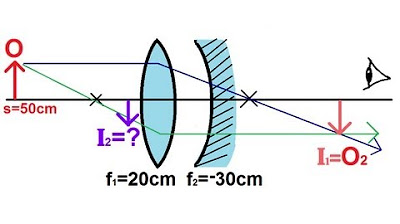
- 🔍 Lens combination four looks identical to lens combination three but the object is placed differently, at 50 cm from the first lens.
- 📏 Using ray diagrams, the image location of the first lens is determined.
- ↔️ Draw a horizontal ray to the converging lens, which then bends to the focal point on the other side.
- 🔄 Draw another ray from the object through the front focal point, bending horizontally after hitting the lens.
- 📊 The first image is located using the equation S1' = S1 * F1 / (S1 - F1), resulting in a distance of 33.3 cm.
- 🔍 The first image is real and inverted, with a magnification of -0.67, indicating it's two-thirds the size of the original object.
- ↔️ The distance from the first image to the second lens is 23.3 cm, as the image of the first lens becomes the object for the second lens.
- 📏 The second lens's image location is found using S2' = S2 * F2 / (S2 - F2), yielding a distance of 104 cm.
- 🔄 The second image is also real and inverted, with a magnification of 4.5 times the size of the second object.
- 🔍 The total magnification of the system is the product of the individual magnifications, resulting in -3, meaning the final image is three times the size of the original object and inverted.
Q & A
What is the main topic of the video script?
-The main topic of the video script is the analysis of lens combination number four, which involves both a converging lens and a diverging lens.
How does the object's position differ in lens combination number four compared to number three?
-In lens combination number four, the object is placed 50 cm away from the first lens, which is a different location compared to lens combination number three.
What is the focal length of the first lens (F1) in the script?
-The focal length of the first lens (F1) is 20 cm.
How is the image location of the first lens determined using ray diagrams?
-The image location of the first lens is determined by drawing a horizontal ray until it hits the converging lens and bends to the focal point on the other side, and then continues on.
What is the formula used to find the image location (S1') of the first lens?
-The formula used to find the image location (S1') of the first lens is S1' = S1 * F1 / (S1 - F1).
What is the calculated distance to the first image (S1') in cm?
-The calculated distance to the first image (S1') is 33.3 cm.
Why is the first image considered a real image?
-The first image is considered a real image because it has a positive image distance, indicating that it is formed on the opposite side of the lens from the object.
How is the magnification (M1) of the first lens calculated?
-The magnification (M1) of the first lens is calculated as M1 = -S1' / S1, which in this case is -33.3 cm / 50 cm, resulting in -0.67.
What does the magnification of -0.67 signify about the image formed by the first lens?
-A magnification of -0.67 signifies that the image is inverted and about 2/3 the size of the original object.
How is the object distance (S2) for the second lens determined in the script?
-The object distance (S2) for the second lens is determined by considering the image of the first lens as the object for the second lens, with a negative value since the object is behind the lens, resulting in S2 = -23.3 cm.
What is the focal length of the second lens (F2) in the script?
-The focal length of the second lens (F2) is -30 cm, indicating it is a diverging lens.
How is the image location (S2') of the second lens calculated?
-The image location (S2') of the second lens is calculated using the formula S2' = S2 * F2 / (S2 - F2), resulting in a positive 104 cm.
What does the positive value of S2' indicate about the second image?
-A positive value of S2' indicates that the second image is a real image, formed on the same side of the lens as the object.
How is the magnification (M2) of the second lens calculated?
-The magnification (M2) of the second lens is calculated as M2 = -S2' / S2, resulting in a positive 4.5.
What does the magnification of 4.5 signify about the second image?
-A magnification of 4.5 signifies that the second image is 4.5 times larger than the second object, which is the image of the first lens, and it is also inverted.
How is the total magnification of the lens combination calculated?
-The total magnification of the lens combination is calculated as the product of the magnifications of the two lenses, M_total = M1 * M2, which results in approximately -3.
What does the total magnification of -3 indicate about the final image?
-A total magnification of -3 indicates that the final image is three times larger than the original object and is inverted in direction.
Outlines
🔍 Explaining Lens Combination Number Four
This paragraph introduces lens combination number four, which is similar to lens combination number three but with a different object placement. The object is positioned 50 cm away from the first lens. The paragraph details the process of locating the first image using ray diagrams and the standard lens equation. The first image distance is calculated as 33.3 cm, and it is a real and inverted image with a magnification of -0.67.
🔭 Finding the Second Image and Magnification
This paragraph explains the process of finding the second image formed by the second lens. The image from the first lens becomes the object for the second lens, with a distance of -23.3 cm due to its position. Using the lens equation, the second image distance is found to be 104 cm, making it a real image. The magnification of the second lens is calculated as 4.5. The paragraph concludes by determining the total magnification, which is -3, indicating the final image is three times the size of the original object and inverted.
Mindmap
Keywords
💡Lens Combination
💡Object Distance (S1)
💡Focal Point
💡Ray Diagrams
💡Image Distance (S1')
💡Magnification (M1)
💡Real Image
💡Inverted Image
💡Diverging Lens
💡Total Magnification
💡Converging Lens
Highlights
Lens combination number four is introduced, which appears identical to lens combination number three but with the object placed at a different location.
The object is positioned 50 cm away from the first lens.
Ray diagrams are used to determine the image location of the first lens.
A horizontal ray is drawn from the object until it hits the converging lens, bending to the focal point on the other side.
A second ray is drawn from the object through the focal point on the front side of the lens.
The first image is formed where the two rays meet.
The standard lens equation S1' = S1 * F1 / (S1 - F1) is used to find the location of the first image.
The first image distance S1' is calculated to be 33.3 cm, indicating a real image.
The magnification M1 is found to be -0.67, meaning the image is inverted and about 2/3 the size of the original object.
The distance from the first image to the second lens is determined to be 23.3 cm.
The image of the first lens becomes the object for the second lens, with a negative object distance of -23.3 cm.
The second image is calculated using the equation S2' = S2 * F2 / (S2 - F2) with a diverging lens having a negative focal length.
The second image distance S2' is found to be 104 cm, indicating a real image.
The magnification of the second lens M2 is +4.5, suggesting the image is upright but inverted due to the previous inversion.
The final image is calculated to be 3 times the size of the original object and inverted, as determined by the total magnification M_total = M1 * M2.
The process demonstrates the use of both converging and diverging lenses in a lens combination to achieve specific image properties.
Transcripts
Browse More Related Video
Physics - Optics: Lenses (3 of 5) Lens Combinations - Converging & Diverging Lenses
Physics - Optics: Lenses (1 of 5) Lens Combinations - Two Converging Lenses
Multiple Two Lens System with Diverging and Converging Lens
Physics - Optics: Lenses (3 of 4) Converging Lens
Physics - Optics: Lenses (5 of 5) Lens Combinations - Converging Lens & Mirror
Physics 54 Optics: Mirrors (2 of 6) Concave Mirror
5.0 / 5 (0 votes)
Thanks for rating: