Resistivity - Required Practical - A-level Physics
TLDRThis educational video script offers a detailed walkthrough of an A-level physics practical investigation to determine the resistivity of a wire by exploring how resistance changes with length or cross-sectional area. The tutorial begins with the theoretical basis for resistivity, explaining equations and terminology, before moving on to the experimental setup involving a circuit with an ammeter, voltmeter, and variable resistor. The presenter emphasizes the importance of keeping the current below 1 amp to prevent the wire from heating, which could affect resistivity readings. Various aspects of the experiment, such as measuring voltage, current, and calculating resistance, are covered alongside considerations for accurate data collection and analysis, including uncertainty calculation and control variables. The video concludes with advice on plotting results and interpreting gradients to find the wire's resistivity, offering a comprehensive guide for students conducting physics experiments.
Takeaways
- 📚 The experiment aims to investigate the relationship between a wire's resistance and its length and cross-sectional area, ultimately determining the wire's resistivity.
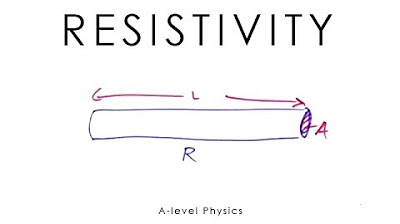
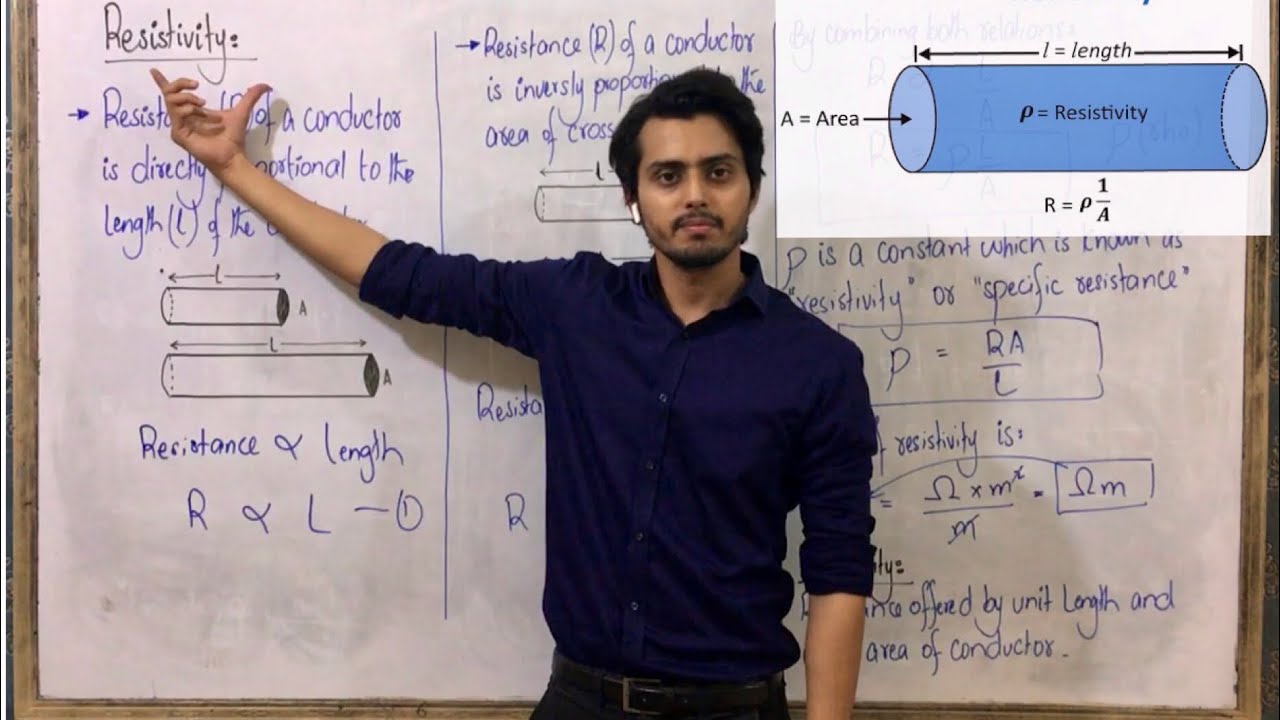
- 🧪 The resistivity (Rho) is calculated using the formula Rho = R * A / L, where R is resistance, A is cross-sectional area, and L is length.
- 🔋 A circuit is required for the experiment, consisting of a power supply, ammeter, wire, and voltmeter.
- 🌡️ To avoid inaccuracies, the experiment should maintain a low current (below 1 amp) to prevent the wire from heating and changing its resistivity.
- 🔩 The length of the wire should be varied in controlled increments to observe how resistance changes, starting at a length that avoids shorting the circuit and excessive heating.
- 📏 The diameter of the wire is measured in three places using a micrometer to find the mean, which is used to calculate the cross-sectional area.
- 📈 The experiment involves plotting resistance against length to obtain a straight line, with the gradient representing Rho / A.
- 🔍 Uncertainties in the experiment arise from the resolution of the measuring instruments (voltmeter, ammeter, and micrometer) and must be accounted for in the results.
- 🏹 To determine the percentage uncertainty in resistivity, both the percentage uncertainty in the area and the gradient must be considered.
- 🎯 The final results should be compared to research values to validate the accuracy of the experiment.
- 📝 The process involves recording PD (potential difference) across the wire and the current, then calculating resistance using Ohm's law (R = V / I).
Q & A
What is the main focus of the A-Level Physics practical investigation discussed in the transcript?
-The main focus is to investigate how the resistance of a wire changes with its length and cross-sectional area, and to find the resistivity of the wire material.
What is the formula for resistivity mentioned in the transcript?
-The formula for resistivity is given as Rhor (Rho) equals R times A over L, where R is resistance, A is the cross-sectional area, and L is the length of the wire.
Why is it important to maintain a low current during the experiment?
-Maintaining a low current, below 1 amp, is important to avoid heating the wire, which could lead to inaccurate readings due to changes in resistivity with temperature.
How does the temperature affect the resistivity of the metal?
-The resistivity of the metal can change with temperature. If the wire heats up, the resistivity may increase, leading to inaccurate experimental results.
What type of wire is recommended for this experiment?
-A wire made of constantan is recommended because its resistivity does not change significantly with temperature, making it suitable for this type of experiment.
How is the length of the wire changed during the experiment?
-The length of the wire can be changed either by physically cutting and reattaching it or by using a crocodile clip that can be moved along the wire to vary the length included in the circuit.
Where should the voltmeter be placed in the circuit to measure the potential difference (PD)?
-The voltmeter should be placed across the wire to measure the PD across it. Alternatively, it could be placed across the entire circuit, as the PD would be the same.
How can the uncertainty in the experiment be minimized?
-Uncertainty can be minimized by using the same gauge wire, ensuring the wire is taut to avoid parallax error, and keeping the current below 1 amp to prevent heating and changes in resistivity.
What is the method for calculating the cross-sectional area of the wire?
-The cross-sectional area is calculated by measuring the diameter of the wire in three places using a micrometer and finding the mean, then using the formula area equals PI times (diameter squared) / 4.
How can the percentage uncertainty in resistivity be determined?
-The percentage uncertainty in resistivity is determined by adding the percentage uncertainty in the area (which is twice the percentage uncertainty in the diameter) and the percentage uncertainty in the gradient of the length vs. resistance graph.
What is the final step in analyzing the results of the experiment?
-The final step is to compare the calculated resistivity with a research value to check for accuracy, and to draw error bars and a line of worst fit on the graph to determine the percentage uncertainty in the gradient.
Outlines
🔬 Introduction to A-Level Physics Practical: Investigating Wire Resistance
This paragraph introduces an A-Level physics practical investigation focused on understanding how the resistance of a wire changes with its length and cross-sectional area. The goal is to determine the resistivity (Rho) of the wire, using the equation Rho equals R times A over L, where R is resistance, A is cross-sectional area, and L is length. The discussion includes the importance of setting up a circuit with a power supply, ammeter, and wire, and the considerations for changing wire length to observe resistance variations. It also touches on safety and accuracy, emphasizing the need to avoid overheating the wire and the importance of using low currents to maintain consistent resistivity throughout the experiment.
📏 Measuring Wire Resistivity and Addressing Uncertainties
The second paragraph delves into the methodology of measuring the wire's resistivity by focusing on the cross-sectional area and the importance of accurate diameter measurements using a micrometer. It discusses the controls needed for a consistent experiment, such as using the same gauge wire and metal to minimize variability in resistivity due to temperature changes. The paragraph also addresses the concept of uncertainties in measurements, explaining how to calculate the percentage uncertainty in resistance by considering the resolution of the voltmeter, ammeter, and micrometer used. Additionally, it provides guidance on plotting the results and estimating the overall percentage uncertainty in resistivity, suggesting comparison with research values for validation.
Mindmap
Keywords
💡Resistivity
💡Resistance
💡Circuit
💡Potential Difference (PD)
💡Ammeter
💡Voltmeter
💡Ohm's Law
💡Micrometer
💡Temperature
💡Uncertainty
💡Gradient
Highlights
Investigating the relationship between resistance of a wire and its length and cross-sectional area.
Using the resistivity equation, Rho equals R a over L, to find the resistivity of a wire.
Measuring resistance as the dependent variable in the experiment.
Exploring how changing the length of the wire affects its resistance.
The importance of a circuit setup with a power supply, ammeter, and wire for the experiment.
Avoiding short circuits by starting with a lengthier wire.
Considering the impact of temperature on resistivity and ensuring consistent current to avoid heating.
Using a crocodile clip to adjust the length of the wire in the circuit.
Positioning the voltmeter across the wire to measure potential difference (PD).
Calculating resistance using Ohm's law, R is V over I.
Recording PD across the wire and the current to calculate resistance.
Plotting resistance against length (L) to obtain a straight line and determine the gradient.
Understanding that the gradient of the graph equals Rho divided by a.
Measuring the wire's diameter in three places to find the mean and calculate the cross-sectional area.
Accounting for uncertainties in V, I, and the area to determine the percentage uncertainty in resistance.
Mitigating uncertainties by using the same gauge wire, low current, and ensuring the wire is taut.
Drawing a line of best fit and a line of worst fit to estimate the percentage uncertainty in the gradient.
Calculating the overall percentage uncertainty in resistivity by combining uncertainties in area and gradient.
Comparing the experimental value of resistivity with research values for accuracy.
Transcripts
Browse More Related Video


5.0 / 5 (0 votes)
Thanks for rating: