11.3 Pernos modelados directos - Descripción
TLDRThe video script discusses the direct modeling technique for fabricating glass fiber posts for teeth without coronal remnants. It outlines the process of creating an explosive cavity, using specific long drills for proper positioning and shaping. The script emphasizes the importance of adhesion with composite resin, which is more viscous than resin cement, and the necessity of an adhesive layer for successful bonding. The technique involves gradual polymerization of the post, careful positioning, and adjustments for optimal fit and retention. The script concludes with the cementation process, offering two options: self-adhesive cement or conventional adhesive and dual-cement, highlighting the precision and scientific understanding required for successful dental restoration.
Takeaways
- 🦷 Direct fiber post fabrication is discussed in the script, specifically for a tooth model without coronal remnants.
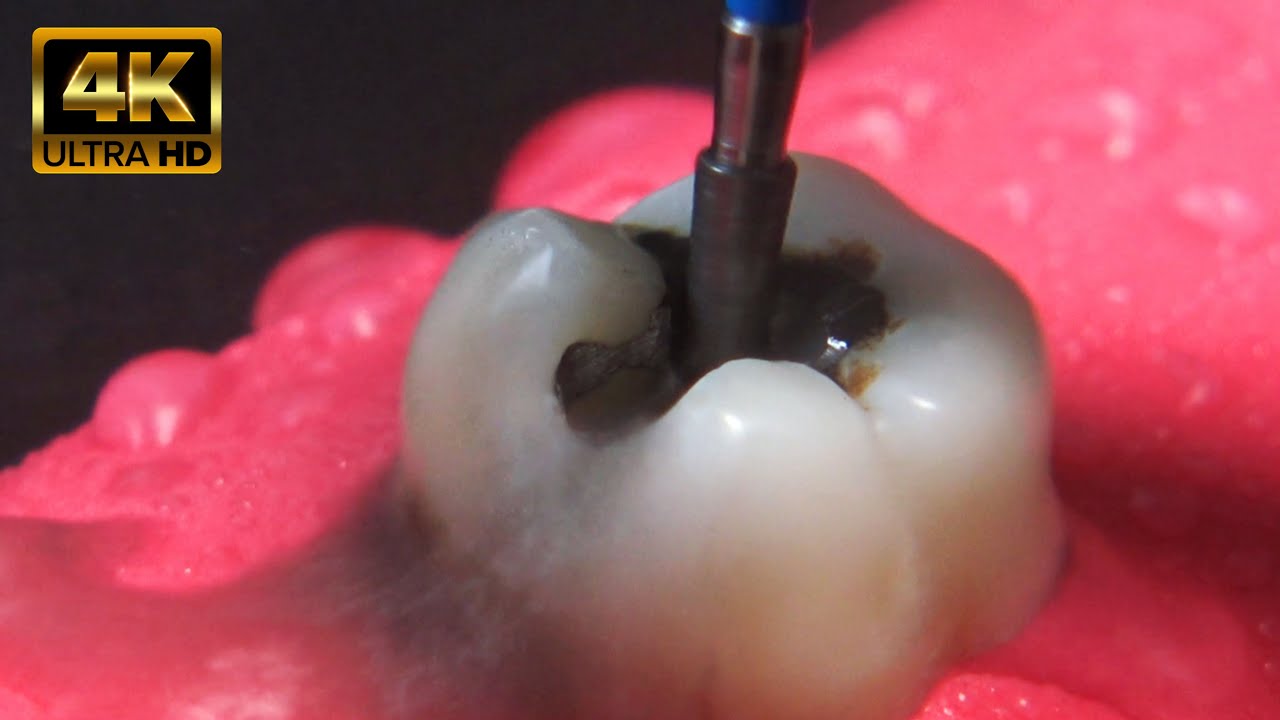
- 🔧 The first step involves creating an explosive cavity if it doesn't exist, using the system's own drills which are long and positioned well towards the apical area, smoothing the surrounding axial walls.
- 💨 An atomized semi-direct technique is used for the in-mouth printing process, ensuring the canal is well-prepared and expansive for the fiber post.
- 📌 The script emphasizes the importance of maintaining stability during the process, ensuring that there is no perception of instability due to cervical space that can be filled.
- 🧪 Resin composite is used to fill the empty area, providing better polymerization and juxtaposition.
- 🔄 The perno (post) is cleaned with alcohol and gauze, following the same sequence as direct cementation, ensuring a clean and dry surface for adhesion.
- 🔴 The application of adhesive in direct modeling is mandatory due to the high viscosity of the composite resin, unlike the fluid resin cement.
- 🚫 Isolation of the canal is necessary and is done with intimate lubricants or glycerin, which is easy to wash away, to prevent retention during the modeling process.
- 📊 A small ball of viscous resin, such as a zeta 350 from Dentina or Brilliant from Dentina, is used to fill the canal and shape the post.
- ⏱️ The post is polymerized in stages, with 5 seconds of light at a time, to avoid complete polymerization and ensure easy removal before final positioning.
- 🖍️ Marking the buccal part of the post with a marker is crucial for checking the position and ensuring proper fit without retention or misplacement.
- 🦷 After the post is properly polymerized and checked, the canal and post are cleaned, and the coronal portion is prepared for final cementation.
Q & A
What is the main topic of the transcript?
-The main topic of the transcript is the direct modeling technique for fiber glass post impression in a tooth model without remaining coronal structure.
What is the first step in the direct modeling process?
-The first step is to create an explosive cavity in the root canal if it does not exist. This is done by using specific long drills that position well towards the apical area and smooth the surrounding axial walls.
How is the process of impression different in direct modeling compared to traditional methods?
-In direct modeling, the impression is done in the mouth itself, using semi-direct atomization. This requires a well-prepared and smooth root canal to facilitate the process.
Why is it important to fill the cervical space in the tooth?
-Filling the cervical space is important because it can be filled by the resin composite, which will provide better polymerization and juxtaposition, ensuring the stability of the post.
How is the post prepared for direct modeling?
-The post is prepared by cleaning it with an alcohol-soaked gauze, following the same sequence as direct cementation. An adhesive is then applied, which is mandatory in direct modeling due to the high viscosity of the composite resin.
What material is used to isolate the root canal during the modeling process?
-Lubricants such as intimate lubricants or glycerin are used to isolate the root canal as they are easy to wash away, preventing any retention of material during the modeling process.
How is the composite resin applied to the post?
-The composite resin is selected and then a small ball of it, such as a zeta 350 from Dentina or a viscous material like Brilliant N G, is used. A cone is made and slowly placed into the isolated root canal, copying the cervical areas with 5 seconds of light exposure to avoid full polymerization and potential retention of the post.
Why is it important to mark the vestibular part of the post before removing it from the mouth?
-Marking the vestibular part of the post is important to ensure that the post is in the correct position. If there is any retention after removal, it helps to determine whether it's due to retention or if the post is out of position.
What are the two cementation options mentioned in the transcript?
-The two cementation options mentioned are self-adhesive cementation and conventional acid adhesive and dual-cure cementation.
How is the excess cement removed after the post is placed?
-The excess cement is removed with a micro hand instrument after polymerization. If there is a possibility to see the cement with a high-intensity lamp, it can be removed more precisely to avoid future issues with the crown.
What is the final step in the direct modeling technique?
-The final step in the direct modeling technique is to polymerize the resin in the apical region and ensure that the post is well juxtaposed. After this, the tooth is prepared for the crown, and the post is ready for cementation.
Outlines
🦷 Direct Modeling Technique and Fiberglass Post Impression
This paragraph discusses the direct modeling technique used for printing a fiberglass post directly in the mouth, specifically in a case where there is no remaining coronal tooth structure. The process begins with creating an explosiveness in the canal if it doesn't exist, using the system's own long burrs to position well towards the apical and smooth the surrounding axial walls. The semi-direct atomization process is facilitated as it is done in the mouth, and the canal is made smooth and explosive. The speaker then fills the empty area with a composite resin that offers better polymerization and adaptation. The direct application of adhesive is mandatory in direct modeling, unlike in direct cementation, due to the high viscosity of the composite resin. The speaker then proceeds with the same sequence as direct cementation, cleaning and applying adhesive before filling the canal with a highly viscous material like a Zeta 350 or Brilliant N G. The post is then gradually filled with the material, with careful attention to the cervical areas, and polymerization is initiated in stages to prevent retention of the post within the root. The post is then marked and checked for proper positioning before final polymerization. The speaker emphasizes the importance of this step to ensure the post's correct placement and to make any necessary adjustments.
📌 Complete Modeling and Cementation Process
This paragraph continues the discussion on the complete modeling process for a total crown, highlighting the intention to leave the post slightly retained to facilitate preparation. The speaker describes two possible approaches for cementation: self-adhesive cementation and conventional acid adhesive and dual cement. The chosen method in this case is self-adhesive cementation due to the small thickness of the cementation line. The cement is applied to the radicular portion and the post is placed, allowing for chemical polymerization time or using light to remove excess cement. The speaker then discusses the removal of excess cement with micro works and the importance of understanding the scientific aspects of the polymerization protocol. The technique for teeth without remaining coronal tooth structure, direct modeling or direct atomization, is concluded with the case presented.
Mindmap
Keywords
💡Direct modeling technique
💡Fiber glass post
💡Cavity preparation
💡Photo polymerization
💡Resin composite
💡Cementation
💡Self-adhesive cement
💡Dentin bonding
💡Lubricants
💡Posterior restoration
💡Tooth preparation
💡Final crown
Highlights
Direct fiber glass post modeling technique discussed.
Post impression directly in the mouth for teeth without coronal remnants.
Creation of a flare in the canal if it doesn't exist, using specific system burs.
Use of semi-direct atomization to facilitate the impression process.
Ensuring post stability by filling cervical space with composite resin.
Cleaning the post with alcohol and gauze following direct cementation protocol.
Application of adhesive is mandatory in direct modeling due to the viscosity of composite resin.
Isolating the canal with intimate lubricants or glycerin to prevent retention during modeling.
Filling the canal with a viscous resin, such as a zeta 350 or brilliant n g, for post adaptation.
Light curing the resin in the canal in 5-second intervals to avoid post retention.
Marking the vestibular part of the post to ensure correct positioning and avoid retention.
Completing polymerization and checking the post's adequate fit before removing it from the canal.
Preparing the post for crown preparation by filling the coronal portion with dentin resin.
Considering two cementation paths: self-adhesive cementation and conventional acid-adhesive cementation.
Using a self-adhesive cement like 3M STP's 2.0 for cementation as it doesn't require treatment.
Removing excess cement with micro works after photo polymerization.
The technique for teeth without coronal remnants is concluded with direct modeling or atomization.
Transcripts
Browse More Related Video

Restaurações Posteriores Cl I e II em Resina Composta
4K AMAZING alternative to rebuilding decayed teeth: inlay

Colocación de Brackets en VIVO / Putting on Braces - LIVE

Single-Visit Bridge (Ribbond)

Buyer's Guide to West System Epoxy

🔴4 MELHORES RESINAS🥇 PARA A CUNHA PALATINA PARA FACETAS EM RESINA🤩🤩🤩🤩🤩🥇
5.0 / 5 (0 votes)
Thanks for rating: