Building my own Ultrasonic Cleaner
TLDRIn this informative video, Bruce Rain from Bragas Creations discusses ultrasonic cleaners, explaining how they use high-frequency sound waves to create cavitation for cleaning various items. He shares his DIY ultrasonic cleaner project, detailing the process, challenges, and lessons learned, ultimately emphasizing the importance of choosing the right cleaner for one's needs and the potential benefits of building your own.
Takeaways
- 📌 Ultrasonic cleaners use high-frequency sound waves above 20 kHz to clean items immersed in a liquid.
- 🔊 The process of ultrasonic cleaning involves creating microscopic bubbles that collapse, producing shock waves to dislodge dirt.
- 💧 The size of the bubbles and cleaning efficiency depends on the ultrasonic frequency, with higher frequencies producing smaller bubbles.
- 🌡️ Heating the liquid and adding detergent can enhance the cleaning power of ultrasonic cleaners.
- 🛠️ DIY ultrasonic cleaners can be made but may face challenges such as transducers falling off or drivers failing.
- 🔧 Proper installation of transducers with adequate glue and possibly welding ensures their stability on the cleaning tank.
- 🌬️ Cooling systems like fans are crucial to prevent overheating of the ultrasonic cleaner's components.
- 🔌 It's important to ground the cleaning tank to prevent electric shocks.
- 🧼 Choosing the right cleaning solution is essential; some are designed specifically for certain materials to avoid damage or future corrosion.
- 🛠️ Ultrasonic cleaners come in various sizes suitable for cleaning different items, from small jewelry to large engine blocks.
- ⏱️ The cleaning time varies based on the dirt level of the item, the cleaner's power, and the type of detergent used.
Q & A
What is the primary function of an ultrasonic cleaner?
-An ultrasonic cleaner uses high-frequency sound waves to create microscopic bubbles in a liquid. These bubbles grow and collapse, creating tiny shock waves that dislodge dirt and grime from the surfaces of submerged items, effectively cleaning them.
How do ultrasonic and low-frequency sound waves differ?
-Ultrasonic sound waves have a frequency higher than 20,000 Hz (20 kilohertz), which is beyond the hearing range of humans. Low-frequency sound waves, on the other hand, have a frequency that falls within the audible range for humans, typically between 20 Hz and 20,000 Hz.
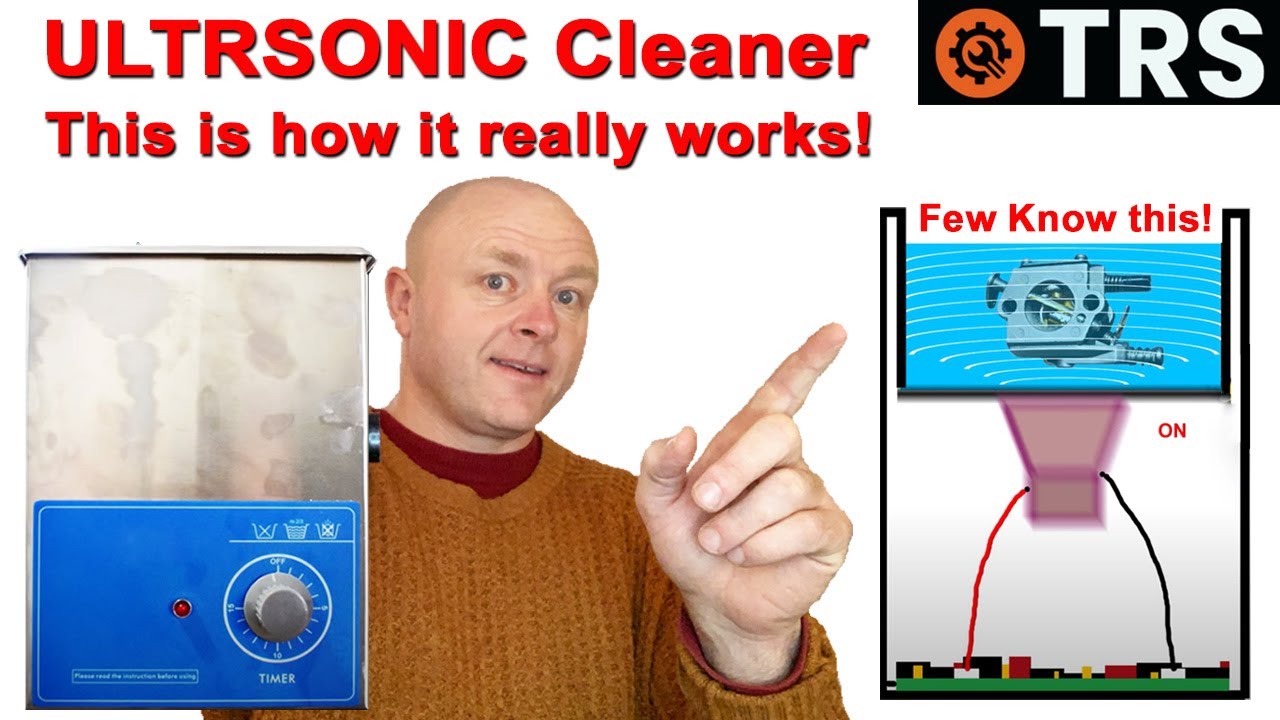
What is cavitation and how does it relate to ultrasonic cleaning?
-Cavitation is a reaction that occurs when ultrasonic sound waves pass through a liquid, forming and collapsing microscopic bubbles. This process generates shock waves that help to clean surfaces by dislodging particles of dirt and grime. True ultrasonic cleaning relies on cavitation, not just agitation or movement in the liquid.
What are some common items that can be cleaned using an ultrasonic cleaner?
-Ultrasonic cleaners can be used to clean a variety of items, including jewelry, electronics, car parts, tools, dentures, and weapons. They are suitable for cleaning hard, non-absorbent materials that can withstand getting wet.
What are the key features to consider when purchasing an ultrasonic cleaner?
-When purchasing an ultrasonic cleaner, consider its capacity, power rating in watts, the presence of a timer and a heater, and the size of the cleaning chamber to ensure it can accommodate the items you intend to clean.
Why is it important to use distilled water in an ultrasonic cleaner?
-Distilled water is used in ultrasonic cleaners because it lacks the impurities and minerals found in tap water. These impurities could remain on the cleaned items and potentially accelerate future corrosion, especially on delicate electronics or metal components.
What type of cleaning solution does the speaker recommend for cleaning electronic components?
-The speaker recommends using a product called 'Electro' made by Cleantech, an Australian company. This solution is specifically designed to remove dirt and flux from electronic components while being gentle on the board metals and components.
What were some of the challenges faced during the process of building a DIY ultrasonic cleaner?
-Some challenges included transducers falling off due to heat and poor adhesion, drivers failing which required replacement of parts, and the need to add a cooling system with fans to prevent overheating. Additionally, there were issues with the quality of the components and the need for proper grounding to avoid electric shocks.
How can you test if an ultrasonic cleaner is working effectively?
-To test if an ultrasonic cleaner is working effectively, place a sheet of aluminum or aluminum foil in the cleaning liquid and turn on the cleaner for 10 seconds. After removing the foil and holding it up to the light, you should see pinholes where the shock waves have torn through the thin foil, indicating the presence of cavitation.
What safety measures should be taken when using or building an ultrasonic cleaner?
-Ensure the cleaning tank is grounded to prevent electric shocks, use a suitable insulation for electrical components, and include a cooling system to manage heat generated by the cleaner. Also, never run the cleaner without the cooling fans running, and use a power monitor to ensure it's using the correct amount of watts.
What is the speaker's overall recommendation for building versus buying an ultrasonic cleaner?
-The speaker suggests that if an off-the-shelf ultrasonic cleaner meets your needs, it's better to purchase it rather than building your own, as building one is filled with challenges. However, if a suitable option is not available, building your own can be a rewarding project.
Outlines
📌 Introduction to Ultrasonic Cleaners
The video begins with Bruce Rain from Bragas Creations introducing the topic of ultrasonic cleaners. He explains what ultrasonic cleaners are, how they function, and their various applications. Bruce also mentions his DIY ultrasonic cleaner project and encourages viewers to like and subscribe to his channel. He discusses the concept of sound waves, differentiating between low and high-frequency sound waves, and defines ultrasonic sound. The paragraph highlights the process of ultrasonic cleaning, which involves passing high-frequency sound waves through a liquid to create microscopic bubbles that collapse and generate shock waves, effectively dislodging dirt and grime.
🛠️ Ultrasonic Cleaner Construction and Testing
In this paragraph, Bruce delves into the construction of his DIY ultrasonic cleaner. He describes the components inside the cleaner, including four 50-watt ultrasonic emitters or transducers, and their placement within a stainless steel tank. Bruce also talks about the removable basket for holding items during the cleaning process. He shares his experience with purchasing an affordable ultrasonic cleaner and emphasizes that it has been effective for his needs. Additionally, he explains the importance of using the right type of liquid and detergent for ultrasonic cleaning, recommending distilled water and a product called Electro. Bruce also provides insights on the cleaning process, including temperature settings and the use of a timer.
🔧 Building a Custom Ultrasonic Cleaner
Bruce discusses his decision to build a custom ultrasonic cleaner to accommodate larger motherboards that do not fit in standard cleaners. He details the process of selecting the right tank, which needed to be large enough, strong, made of stainless steel, and have a lid. He opted for a gastronorm-sized tray commonly used in professional kitchens. Bruce explains the calculations required to determine the necessary ultrasonic power for his cleaner and describes the process of assembling the transducers, including the challenges he faced with the adhesive and wiring process. He also discusses the importance of grounding the cleaner to prevent electric shocks.
🌡️ Testing and Troubleshooting the Ultrasonic Cleaner
This paragraph focuses on Bruce's testing and troubleshooting of his homemade ultrasonic cleaner. He describes the initial success and subsequent issues, such as transducers becoming unstuck due to heat. Bruce details his efforts to build a cooling system using fans and the importance of this cooling mechanism. He also discusses the various technical issues he encountered, including blown fuses and driver failures, and his solutions to fix them. Bruce emphasizes the importance of using the correct wattage for the cleaner and the addition of a timer to prevent accidental operation without the cooling fans running.
📚 Lessons Learned and Final Thoughts
In the final paragraph, Bruce shares the lessons he learned from building his ultrasonic cleaner. He advises viewers to consider buying an off-the-shelf cleaner if one meets their needs, as building one comes with many challenges. However, he expresses satisfaction with his own project and provides tips for those who decide to build their own cleaner. These tips include using coarse sandpaper for better adhesion of the transducers, using ample glue, considering welding for more secure attachment, and ensuring proper cooling and grounding. Bruce concludes by encouraging viewers to provide feedback and to subscribe to his channel for more content.
Mindmap
Keywords
💡Ultrasonic cleaner
💡Cavitation
💡Frequency
💡Transducers
💡Cleaning solution
💡Timer
💡Heater
💡DIY (Do It Yourself)
💡Cavitation test
💡Gastronorm
💡Cooling system
Highlights
Ultrasonic cleaners use high frequency sound waves to create a reaction called cavitation for cleaning purposes.
Sound waves are measured in hertz, with ultrasonic sound being beyond the human audible range of 20 kilohertz.
Ultrasonic cleaning forms microscopic bubbles that grow and collapse, creating shock waves to dislodge dirt.
The size of the bubbles depends on the ultrasonic frequency, with higher frequencies producing smaller bubbles.
Ultrasonic cleaners can be heated and detergents can be added to improve cleaning efficiency.
There are various sizes of ultrasonic cleaners, suitable for cleaning different items from jewelry to engine blocks.
Ultrasonic cleaners are gentle and can clean electronics as long as they are not in operation and are thoroughly dried afterwards.
The power and capacity of ultrasonic cleaners are important factors to consider when purchasing one.
The narrator shares their experience with an affordable ultrasonic cleaner that has been effective for cleaning electronics.
The cleaning process involves using distilled water and a specific cleaning detergent to avoid future corrosion.
Ultrasonic cleaners can be used to clean a wide variety of hard, non-absorbent materials.
Some electronic components like gyroscopes and microphones are sensitive to ultrasonic sound waves and should not be cleaned with ultrasonic cleaners.
The narrator decided to build their own ultrasonic cleaner to accommodate larger items like vintage computer motherboards.
The DIY ultrasonic cleaner project involved sourcing a suitable tank, ultrasonic transducers, and a power supply.
The homemade cleaner faced several challenges including transducers falling off and driver failures.
Lessons learned from building the ultrasonic cleaner include the importance of proper surface preparation, adequate glue, and cooling systems.
The narrator concludes that while building an ultrasonic cleaner can be challenging, they are satisfied with their homemade solution.
Transcripts
Browse More Related Video
Ultrasonic Cleaner - How they Work & How they Clean your Carburetor - Fascinating! (Full Version)

How to use an Ultrasonic Cleaner to Clean Watch Parts: A beginners guide

What Happened When I Put These Parts In An Ultrasonic Cleaner - Bike Maintenance

Ultrasonic Tooth Cleaner Warning

Ultrasonic Cleaner BATTLE! VEVOR VS. Harbor Freight! Unboxing, review, and carburetor cleaning!

Hangsun Professional Dental Care Kit- Plaque Remover for Teeth with 5 Adjustable Modes | 2022 REVIEW
5.0 / 5 (0 votes)
Thanks for rating: