Ultrasonic Transducers - Measurements and Horn Design
TLDRThe video script provides a detailed guide on measuring the resonant frequency of an ultrasonic transducer and tuning a horn to match its frequency. It explains the setup with a sine wave signal generator and oscilloscope, the importance of using a sine wave over a square wave for accurate measurements, and the process of attaching various horns to find the one that resonates best with the transducer. The script also touches on the impact of temperature on resonant frequency and the necessity of considering the final use of the horn when tuning it. The process involves iterative adjustments, ensuring the horn's length corresponds to the desired frequency for optimal performance.
Takeaways
- 🎥 The video demonstrates how to measure the resonant frequency of an ultrasonic transducer and tune a horn for it.
- 🔋 A sine wave signal generator and an oscilloscope are essential tools for measuring the resonant frequency.
- 📊 The resonant frequency is identified by observing the current draw, which peaks at the resonant frequency.
- 🌐 The speed of sound in the material of the horn affects the required length for resonance with the transducer.
- 🔩 The process of tuning a horn involves attaching it to the transducer and iteratively shortening it until the desired resonance is achieved.
- 🛠️ The video provides practical tips on how to machine and adjust the horn for optimal performance.
- 📐 The wavelength of the ultrasonic frequency is used to estimate the length of the horn, typically by using half the wavelength.
- 🔨 Loading the transducer, such as by hand, changes its impedance and current draw, illustrating the impact of load on resonance.
- 🔄 The resonant frequency can be slightly affected by temperature, which should be taken into account during tuning.
- 💡 The video emphasizes the importance of using a sine wave for accurate measurement, as opposed to a square wave which can give false readings.
- 🌟 The final setup should match the resonant frequency of the transducer, horn, and any additional tip or tool for optimal performance.
Q & A
What is the main topic of the video?
-The main topic of the video is to demonstrate how to measure the resonant frequency of an ultrasonic transducer and how to machine and tune a suitable horn for use with the transducer.
What equipment is used to measure the resonant frequency of the ultrasonic transducer?
-A sine wave signal generator, an oscilloscope, and a 100-ohm resistor are used to measure the resonant frequency of the ultrasonic transducer.
How does the resistor help in the measurement process?
-The resistor allows the measurement of the current flowing through the circuit, which is crucial in determining the resonant frequency where the current draw is the greatest.
What happens to the current when the frequency of the signal generator is increased?
-As the frequency of the signal generator is increased, the current starts to increase until it reaches the resonant frequency. Beyond the resonant frequency, further increase in frequency causes the current to decrease.
Why does the voltage waveform decrease slightly when the resonant frequency is reached?
-The voltage waveform decreases slightly because the signal generator cannot deliver a large amount of current, causing its output voltage to drop slightly.
How does the transducer behave at resonance in terms of its electrical properties?
-At resonance, the transducer appears as a pure resistive load because both current and voltage are in phase, making it easy to drive with an inverter.
What is the theoretical length of the horn calculated to be?
-The theoretical length of the horn is calculated to be 10 cm, which is half the wavelength of the ultrasonic wave in aluminum, assuming a speed of sound of 5,800 m/s.
How does the resonant frequency change when a horn is attached to the transducer?
-When a horn is attached to the transducer, the resonant frequency shifts. In the video, it is shown that the resonant frequency decreases to 25.2 kHz, which is lower than the original resonant frequency of the bare transducer.
What is the purpose of tuning the horn?
-The purpose of tuning the horn is to match its resonant frequency as closely as possible to that of the original transducer, ensuring optimal performance and efficiency of the ultrasonic system.
Why is it important to consider the end effector or tool when tuning the horn?
-It is important to consider the end effector or tool when tuning the horn because these attachments can shift the resonant frequency. The horn should be tuned with the intended end effector or tool attached to ensure the correct resonant frequency is achieved.
How does temperature affect the resonant frequency of the transducer?
-Temperature has a minor effect on the resonant frequency of the transducer. As the transducer warms up, its resonant frequency slightly decreases.
Outlines
🔊 Measuring the Resonant Frequency of an Ultrasonic Transducer
This paragraph introduces the process of measuring the resonant frequency of an ultrasonic transducer. It explains the setup involving a sine wave signal generator, a 100-ohm resistor, and an oscilloscope. The signal generator outputs a few volts, which is connected to the transducer and the resistor in series. The resistor allows for the measurement of current flow, while the oscilloscope provides information on the voltage applied and the current flow. The process involves adjusting the frequency of the signal generator to identify the resonant frequency where the current draw is greatest. The paragraph also discusses the characteristics of the transducer at and below resonance, highlighting the phase relationship between current and voltage.
🛠️ Crafting and Tuning an Ultrasonic Horn
The second paragraph delves into the process of creating and tuning an ultrasonic horn, starting with the selection of aluminum as the material due to its workability. It discusses the importance of the speed of sound in the material and how it affects the wavelength. The paragraph outlines the calculation of the wavelength based on the resonant frequency of the transducer and the speed of sound in aluminum. It then describes the practical steps of cutting the aluminum rod, attaching it to the transducer, and iteratively tuning the horn by adjusting its length to match the transducer's resonant frequency. The process involves measuring, shortening, and re-measuring until the desired resonance is achieved.
🔧 Experimenting with Different Horns and Tips
This paragraph presents an exploration of various horn and tip configurations and their impact on the resonant frequency. It describes the use of a stepped horn that has been pre-tuned and the effect of attaching a drill tip, which slightly shifts the resonant frequency. The paragraph emphasizes the importance of tuning the horn with any end effector attached, as modifying the horn after attachment can significantly alter its resonant properties. It also discusses the use of different tips, such as a flat tip and a threaded rod, and how they can be used to tune the frequency. The paragraph highlights that not all tools provide a sharp resonance and that the choice of tip can affect the efficiency of the ultrasonic system.
🌡️ The Effect of Temperature on Resonant Frequency
The fourth paragraph investigates the influence of temperature on the resonant frequency of the transducer. It explains that while the transducer warms up during operation, the resonant frequency can shift, albeit not significantly. The paragraph describes an experiment where the transducer's resonant frequency is measured at different temperatures, demonstrating that a higher temperature leads to a slightly lower resonant frequency. This information is crucial for ensuring consistent performance of the ultrasonic system under varying operating conditions.
📋 Summary of Measuring and Tuning Procedures
The fifth paragraph provides a comprehensive summary of the procedures for measuring the resonant frequency of a transducer and tuning a horn to match. It reiterates the importance of using a sine wave signal generator and oscilloscope for accurate measurements. The paragraph also cautions against using a square wave inverter for this purpose, as it can lead to inaccurate readings and misunderstandings of the resonant frequency. It emphasizes the need to plan ahead for any attachments that will be added to the horn and to adjust the horn's length accordingly. The paragraph concludes with a reminder of the importance of the process and offers to answer any questions.
🤖 Final Thoughts and Closing
The final paragraph wraps up the video script by inviting viewers to ask questions if they have any and expressing hope that the content was found interesting. It provides a brief reiteration of the importance of understanding the concepts of mechanical and electrical resonance when working with ultrasonic transducers and horns. The paragraph acknowledges the complexity of the subject but assures that once the setup is understood, the process becomes manageable and straightforward.
Mindmap
Keywords
💡Resonant Frequency
💡Ultrasonic Transducer
💡Signal Generator
💡Oscilloscope
💡Capacitive Load
💡Impedance
💡Speed of Sound
💡Wavelength
💡Tuning
💡End Effector
💡Mechanical Resonance
Highlights
The video demonstrates how to measure the resonant frequency of an ultrasonic transducer and tune a suitable horn.
A sine wave signal generator is used to produce a few volts, which is connected to the ultrasonic transducer and a 100-ohm resistor in series.
The current flowing through the circuit is measured using a 100-ohm resistor, allowing the identification of the resonant frequency where the current draw is greatest.
The resonant frequency is found by adjusting the frequency of the signal generator and observing the current draw.
Below resonance, the current lags the voltage by 90°, making the transducer appear as a capacitive load, while at resonance, the current and voltage are in phase, making the transducer appear as a resistive load.
Loading the transducer, such as by placing a hand on its end, increases its impedance and reduces the current draw.
The resonant frequency of the bare transducer is determined to be 28.58 kHz.
The speed of sound in aluminum is considered for calculating the horn length, with a wavelength of approximately 20 cm at the resonant frequency.
A piece of aluminum rod, 10 cm long, is theoretically the right length for the horn to resonate at the same frequency as the transducer.
The video shows the process of attaching the horn to the transducer and measuring the new resonant frequency of the transducer-horn system.
The resonant frequency of the transducer with the horn attached is found to be 25.2 kHz, which is lower than the original frequency.
The process of tuning the horn involves shortening it and measuring the resonant frequency until it matches the original transducer's frequency.
The addition of a drill tip to the horn shifts its resonant frequency slightly, so the horn should be tuned with the drill tip attached.
Not all tools or tips attached to the horn give a sharp resonance, as demonstrated with a scalpel blade.
An extension horn is used for sonicating liquids, and its length is adjusted to match the resonant frequency of the bare transducer.
Holding the horn at a node point significantly reduces the current, illustrating the importance of mounting the transducer-horn assembly at a node point.
Using a sine wave is crucial for measuring resonant frequency, as a square wave can give false indications and is more difficult to interpret.
The resonant frequency is slightly affected by temperature, decreasing as the transducer warms up.
A summary of the procedure is provided, emphasizing the importance of using a sine wave and the process of measuring, estimating horn length, and shortening the horn until it matches the transducer's resonant frequency.
Transcripts
Browse More Related Video

DIY Ultrasonic Mixer

Parameters to measure in ultrasonic transducer impedance analysis

Aliasing Artifact | Ultrasound Physics Course | Radiology Physics Course #23
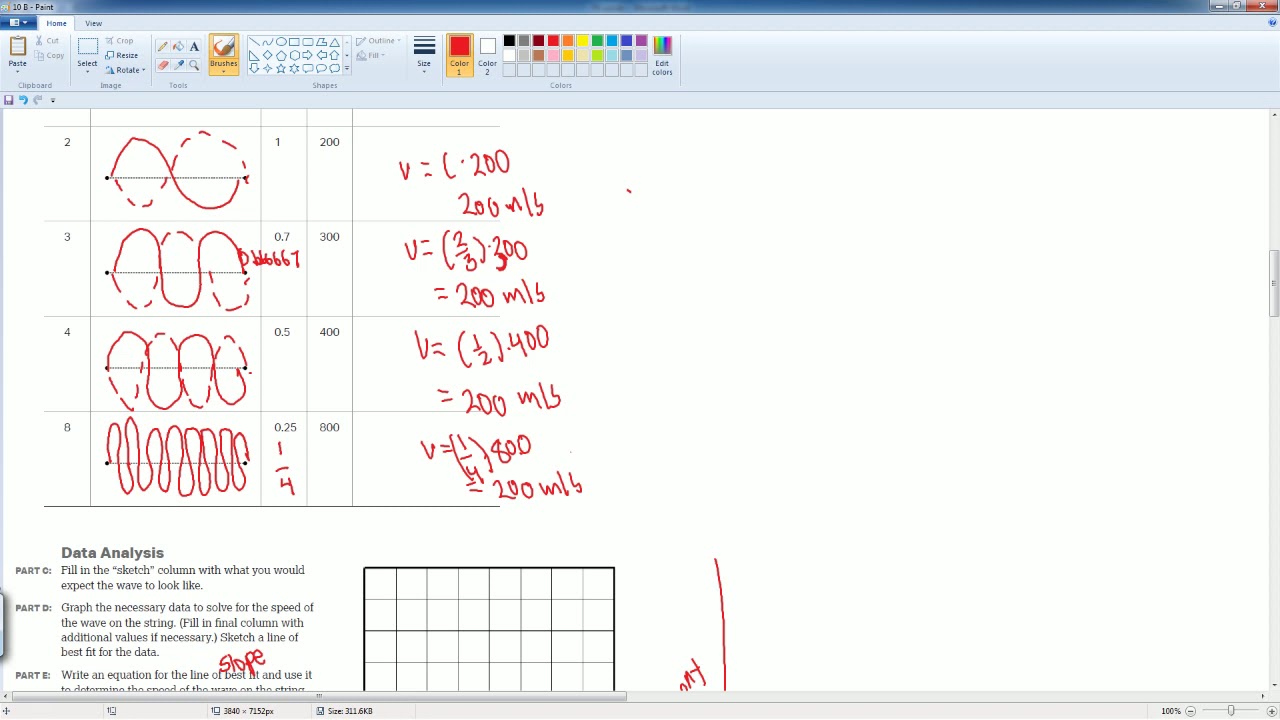
AP Physics Workbook 10.B Relationship Between Wave Speed, Frequency, and Wavelength

Identify chemicals with radio frequencies - Nuclear Quadrupole Resonance (MRI without magnets)
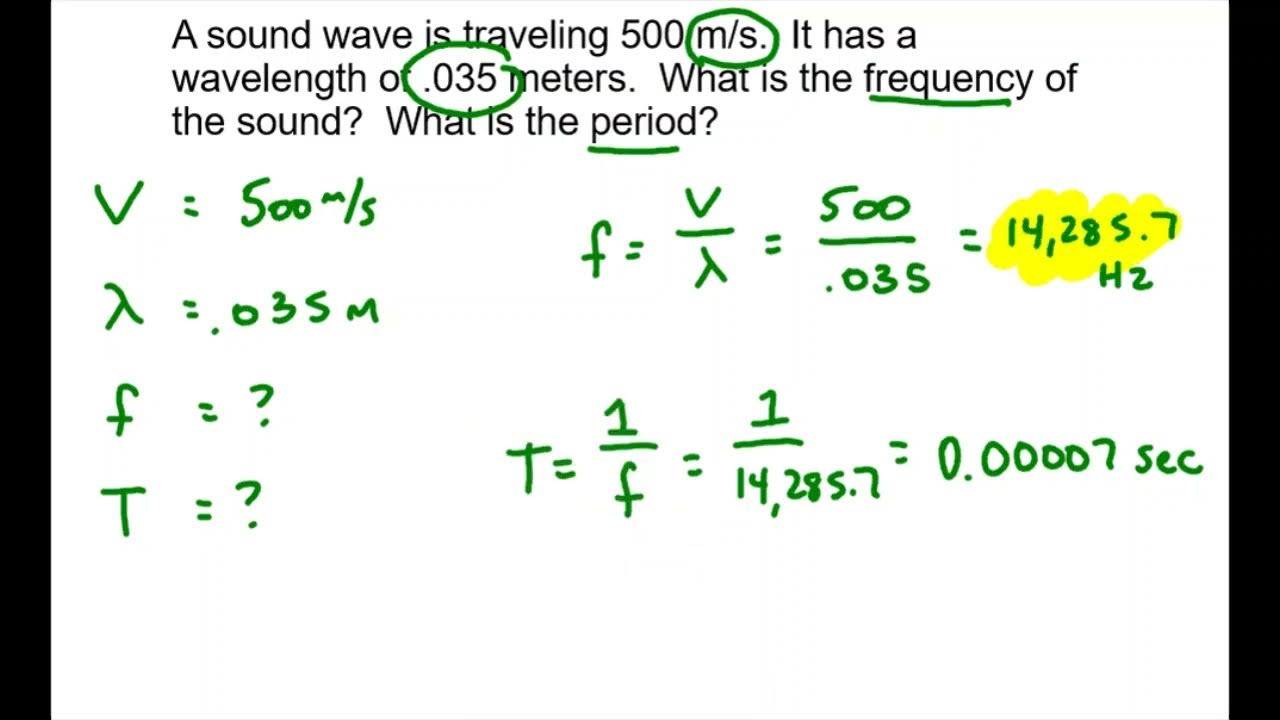
Wave Speed Practice Problems v2
5.0 / 5 (0 votes)
Thanks for rating: