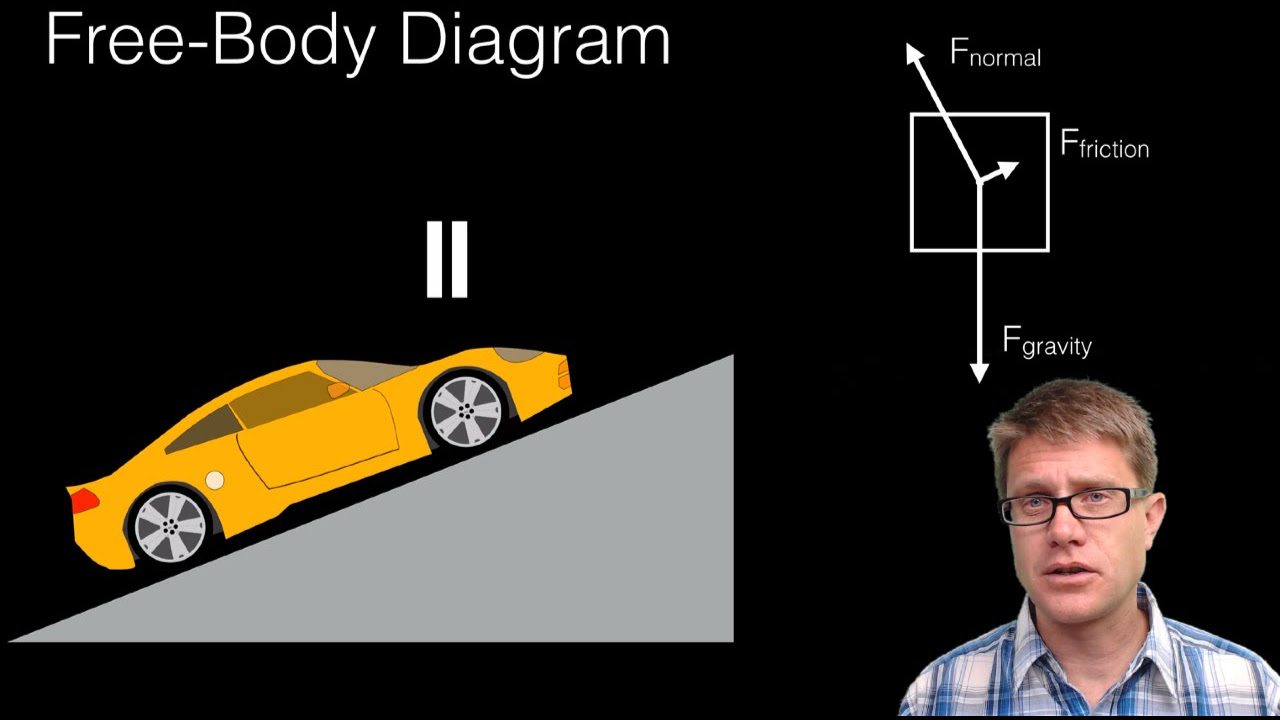
Drawing Free-Body Diagrams With Examples
TLDRThis video tutorial from the Physics Classroom series explains how to draw free body diagrams, which depict the forces acting on an object. It outlines the steps to identify the types of forces, such as gravity, tension, and friction, and their directions. The video then demonstrates how to represent these forces with arrows, labeling and sizing them according to their strength and direction. Examples are provided to illustrate the process, emphasizing that longer arrows indicate stronger forces and that balanced forces of equal strength are of the same length. The tutorial concludes with an action plan for further learning and practice.
Takeaways
- 📚 A free body diagram is a visual representation of the forces acting on an object, with arrows indicating direction, type, and magnitude of each force.
- 🌐 The types of forces to consider include gravity (F_gravity), normal force (F_normal), tension (F_tension), friction, spring force (F_spring), and applied force.
- 🔍 To begin drawing a free body diagram, identify if there are any non-contact forces like gravity or electrical/magnetic forces, and if the object is in contact with anything that could exert a force.
- 🎯 For each force identified, draw an arrow on a box representing the object, with the direction of the arrow corresponding to the force's direction.
- 🏷️ Label each arrow with the type of force it represents, such as 'F_gravity' for gravitational force or 'F_normal' for the normal force.
- The length of the arrows represents the relative strength of the forces; longer arrows indicate stronger forces. Opposing forces at rest are typically drawn with equal lengths. 📖 Examples provided in the script include a book at rest on a table (gravity and normal force), a hanging book (gravity and tension), a person pushing a crate (gravity, normal force, applied force, and friction), a skydiver accelerating downwards (gravity and air resistance), a car skidding to a stop (gravity, normal force, and friction), and an elevator slowing down (gravity and tension).
- 🚀 In cases of acceleration, the direction of the net force is indicated by the longer arrow representing the greater force.
- 📈 The process of drawing a free body diagram involves four steps: identifying the forces, determining their direction, assessing their relative magnitudes, and then visually representing them with arrows.
- 🛠️ Practice drawing free body diagrams with concept builders or interactive tools available online to reinforce understanding.
- 📋 For further study and reference, consult tutorials and chapters dedicated to Newton's laws and free body diagrams.
- 👍 Engage with the content by liking, subscribing, and leaving comments or questions to support the educational platform.
Q & A
What is a free body diagram?
-A free body diagram is a visual representation of all the forces acting upon an object. It uses arrows to depict the magnitude, direction, and type of each force.
How many types of forces are typically represented in a free body diagram?
-In a free body diagram, there are usually six types of forces represented: gravitational force (F_gravity), normal force (F_normal), tension force (F_tension), friction force (F_friction), applied force (F_applied), and sometimes air resistance force.
What does the length of the arrows in a free body diagram signify?
-The length of the arrows in a free body diagram is proportional to the strength of the forces they represent. Longer arrows indicate stronger forces.
How do you determine the direction of the gravitational force in a free body diagram?
-The direction of the gravitational force, represented by F_gravity, is always downward, towards the center of the Earth.
What is the normal force and how is it depicted in a free body diagram?
-The normal force is the force exerted by a surface in reaction to a force applied to it. In a free body diagram, it is represented by an arrow pointing in the opposite direction to the applied force, typically upwards if the object is on a horizontal surface.
What is the purpose of drawing a free body diagram?
-The purpose of drawing a free body diagram is to analyze the forces acting on an object, which helps in understanding the object's motion and solving problems involving Newton's laws of motion.
How do you determine if there are contact forces acting on an object?
-To determine if there are contact forces, you ask if there is anything touching the object in question. If there is, identify the type of contact (e.g., table, string, floor) and the corresponding force it exerts (e.g., normal force, tension, friction).
What happens to the forces in a free body diagram when an object is in equilibrium?
-When an object is in equilibrium, the forces in the free body diagram balance each other out. This means that the forces acting in opposite directions are equal in magnitude and the object remains at rest or moves at a constant velocity.
How do you draw a free body diagram for an object that is accelerating?
-For an accelerating object, the free body diagram reflects the net force by making the arrow representing the dominant force (the direction of acceleration) longer than the opposing force.
What are the steps to draw a free body diagram?
-The steps to draw a free body diagram are: 1) Identify the types of forces acting on the object, 2) Determine the direction of these forces, 3) Assess the relative magnitude of each force, and 4) Draw arrows representing each force, label them, and adjust their lengths to show the relative strengths.
How can you enhance your understanding of free body diagrams?
-To enhance your understanding of free body diagrams, practice drawing them for various scenarios, use interactive tools or concept builders available online, and review tutorials that cover Newton's laws of motion and the application of free body diagrams.
Outlines
📚 Introduction to Free Body Diagrams
This paragraph introduces the concept of free body diagrams, which are used to represent the relative strength and direction of individual forces acting upon an object. It explains that a free body diagram consists of arrows representing different forces, each labeled according to the type of force it represents. The paragraph emphasizes the importance of understanding the types of forces, such as gravity, normal force, tension, spring force, friction, and applied force, to accurately draw a free body diagram. It also outlines the first steps in drawing a free body diagram, which include identifying the types of forces acting on an object, their direction, and the presence of any non-contact forces like gravity or electrical forces.
🎯 Steps for Drawing Free Body Diagrams
This paragraph delves into the process of drawing free body diagrams, detailing the steps one must follow. It begins by discussing the need to identify if any planets, magnets, or charges are nearby to determine the presence of non-contact forces. The paragraph then explains how to determine if there are contact forces acting on the object by asking if anything is touching it. It proceeds to describe how to draw arrows representing the forces on the object, label them according to their type, and size them based on their relative strength. The paragraph provides examples of different scenarios, such as a book at rest on a table, a book hanging from a string, a person pushing a crate, skydivers falling and speeding up, a car skidding to a stop, and an elevator slowing down, to illustrate the application of these steps.
🚀 Action Plan for Learning Free Body Diagrams
In the final paragraph, the speaker provides an action plan for viewers to solidify their understanding of free body diagrams. They recommend using a concept builder or an interactive tool available on their website for practice. Additionally, they direct viewers to their tutorials for a more in-depth study, specifically mentioning the Newton's laws chapter and a dedicated page for drawing free body diagrams. The speaker concludes by wishing the viewers the best of luck in their learning journey and encourages them to like, subscribe, and turn on notifications for new video releases.
Mindmap
Keywords
💡Free Body Diagram
💡Forces
💡Gravity
💡Normal Force
💡Tension
💡Friction
💡Applied Force
💡Acceleration
💡Equilibrium
💡Direction
Highlights
A free body diagram represents the relative strength and direction of individual forces acting upon an object.
Each arrow on a free body diagram represents a force and has a specific direction and label indicating the type of force.
Longer arrows on a free body diagram represent stronger forces.
The force of gravity (F_gravity) is always present and acts downward.
The normal force (F_normal) acts when two surfaces press against each other.
Tension force (F_tension) is due to a string, rope, wire, or cable connected to the object.
A spring force (F_spring) is from a compressed or stretched spring in contact with the object.
Friction force occurs when two surfaces slide across each other.
The air resistance force acts on objects moving through surrounding air.
To draw a free body diagram, first identify the types of forces acting on the object and their directions.
Ask if there are any non-contact forces such as gravity, electric, or magnetic forces present.
Determine if there are contact forces by checking if the object is touching anything that could exert a force.
Draw an arrow for each force on the object, represented by a box, in the direction of the force.
Label each arrow with the type of force it represents, such as gravity or normal force.
Size the arrows according to their relative strength; stronger forces have longer arrows.
In a free body diagram, balanced forces at rest are represented by arrows of the same length.
For an object in constant motion, the forces are balanced and arrows are of equal length.
When an object is accelerating, the force causing the acceleration is represented by a longer arrow.
The process of drawing a free body diagram involves determining the forces, their directions, relative sizes, and then visually representing them.
For an object slowing down, the force opposite to the direction of motion is larger.
The task of drawing a free body diagram is summarized into four basic steps: identify forces, determine directions, assess relative sizes, and represent them graphically.
Transcripts


5.0 / 5 (0 votes)
Thanks for rating: