Technique: Using Serological Pipette
TLDRThis instructional script demonstrates the proper use of a pipette for precise liquid measurement. It begins with attaching the bulb and creating a vacuum by squeezing it partially. The user is then guided to submerge the pipette tip, release the pressure to draw liquid, and hold it vertically to read the volume. The process involves adjusting the liquid level by controlling pressure with a thumb and observing the meniscus to ensure accuracy. The demonstration concludes with transferring the measured liquid to a vial, adjusting the volume to the desired mark, and weighing the filled vial to confirm the accuracy of the measurement.
Takeaways
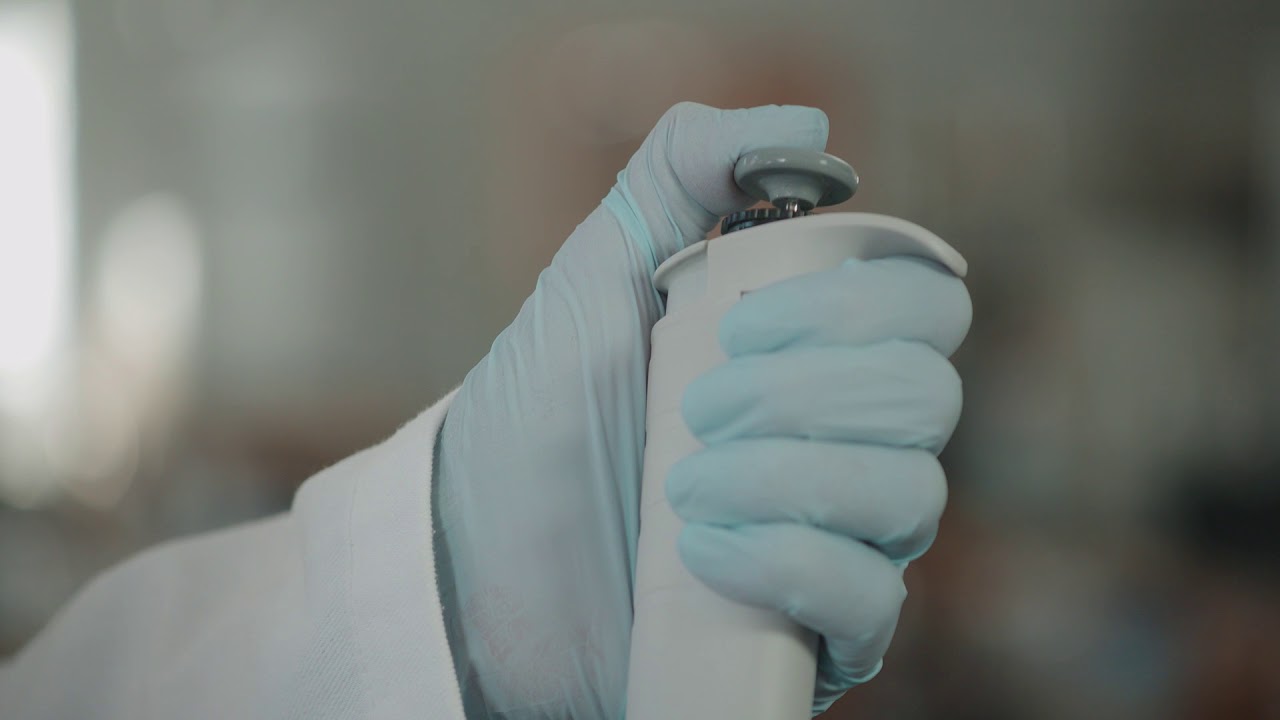
- 💧 Proper placement of the bulb is crucial for creating a vacuum in the pipette.
- 🫙 The bulb should be squeezed to expel air before drawing liquid.
- 🔬 The pipette tip should be placed at the bottom of the container to draw liquid.
- 👁️ Observing the meniscus is key to accurately measuring the volume.
- 👍 Releasing the pressure gradually allows for precise volume control.
- ✋ Thumb placement is used to stop the flow and adjust the volume.
- 📏 It's important to align the meniscus with the desired volume marking.
- 📉 Releasing pressure causes the liquid level to drop, which is monitored closely.
- 🔄 The process may require adjusting the pressure to achieve the exact volume.
- 💊 Transferring the liquid to a vial involves careful control of the pipette.
- ⚖️ The final step involves weighing the vial to confirm the liquid's weight.
Q & A
What is the purpose of the bulb in a pipette?
-The bulb in a pipette is used to create a vacuum. When you squeeze the bulb, it expels air, allowing you to draw up liquid into the pipette by releasing the pressure.
How should you insert the bulb into the pipette?
-You should insert the bulb firmly into the pipette so that it doesn't fall out, but you should not push it all the way down. It needs to make contact to facilitate the vacuum.
What sound do you expect to hear when you squeeze the bulb of the pipette?
-When you squeeze the bulb, you should hear a sound of air being pushed out, indicating that the vacuum is being created.
How do you transfer the liquid from the pipette to a beaker?
-You put the tip of the pipette to the bottom of the beaker, slightly release the pressure on the bulb, and then quickly remove the bulb, replacing it with your thumb to push out the liquid.
What is the meniscus and why is it important to observe it?
-The meniscus is the curved surface of the liquid in the pipette. It's important to observe the meniscus to accurately read the volume of the liquid and ensure that it reaches the desired measurement mark.
How do you adjust the volume of liquid in the pipette to the desired level?
-You adjust the volume by releasing or applying pressure on the bulb or your thumb. You can control the flow of the liquid by carefully watching the meniscus and adjusting the pressure accordingly.
What is the correct way to fill the pipette to a specific volume, such as 10 mL?
-You start by filling the pipette slightly above the desired volume, then kneel to get a better view of the meniscus. You release the pressure gradually until the meniscus reaches the 10 mL mark, and then stop.
How do you ensure accuracy when measuring liquid with a pipette?
-Accuracy is ensured by carefully observing the meniscus and adjusting the pressure on the bulb or your thumb to make sure the liquid level aligns with the desired measurement mark without going over it.
What is the final step after filling the pipette to the desired volume?
-The final step is to cap the vial containing the liquid, place it on a scale, and close the scale door to read the weight of the vial with the liquid.
Why is it important to use a scale to weigh the vial after transferring the liquid?
-Using a scale to weigh the vial after transferring the liquid ensures that the correct volume has been transferred, especially when precise measurements are critical for the experiment or procedure.
How do you prevent spillage when transferring liquid from the pipette to a beaker or vial?
-To prevent spillage, you should control the flow of the liquid by applying and releasing pressure on the bulb or your thumb, and ensure that the pipette tip is positioned correctly in the container.
What is the significance of the zero marking on the pipette?
-The zero marking on the pipette is the reference point from which you start measuring the volume of the liquid. It's crucial for ensuring that you are measuring the correct amount of liquid.
Outlines
🧪 Pipette Usage and Measurement Technique
This paragraph demonstrates the correct method for using a pipette to measure liquids accurately. It begins with the proper placement of the bulb to create a vacuum and ensuring a firm but not overly tight fit. The user is instructed to squeeze the bulb to expel air, then submerge the pipette tip into the liquid and gradually release the pressure to draw up the liquid. The importance of observing the meniscus is highlighted, and the user is guided through adjusting the pipette to ensure the liquid level is at the zero mark. The process continues with measuring out a specific volume, such as 10 mL, by releasing the liquid slowly and monitoring the meniscus at the desired marking. The paragraph concludes with transferring the measured liquid into a vial, capping it, and weighing it to confirm the accuracy of the measurement.
Mindmap
Keywords
💡Pipette
💡Bulb
💡Vacuum
💡Meniscus
💡Beaker
💡Vial
💡Scale
💡Volume
💡Pressure
💡Marking
💡Release
Highlights
Introduction to using a pipette with a bulb
Proper placement of the bulb for creating a vacuum
Avoiding over-pushing the bulb to ensure proper contact
Explanation of the vacuum principle for liquid aspiration
Technique of squeezing the bulb to expel air
Positioning the pipette tip at the beaker's bottom
Releasing pressure to draw liquid into the pipette
Demonstration of vertical pipette positioning
Quick removal and replacement of the bulb with a thumb
Visual confirmation of volume level in the pipette
Adjusting pipette position for accurate volume measurement
Using the meniscus for precise volume alignment
Controlling liquid flow with thumb pressure
Releasing liquid into a vial until reaching the 10 mL mark
Approach to estimating volume before reaching the exact mark
Finalizing the volume measurement with careful observation
Transferring the remaining liquid to a beaker
Capping the vial and weighing it for accuracy
Final weight reading of the vial
Transcripts


5.0 / 5 (0 votes)
Thanks for rating: