Fused Glass Checkerboard Bowl Using an Easy Technique, Glass Fusing Project
TLDRIn this engaging video, Jeff from Rocket Rose Art demonstrates the creation of a large Chinese bowl using a simple yet creative technique with 30ml by 30ml glass squares. The process involves cutting, layering, and fusing glass pieces in a pattern before slumping in a mold. Despite being a bit tedious, the result is a stunning bowl with a beautiful light effect, showcasing the potential for various color combinations. Jeff encourages viewers to try the project and experiment with different shapes and sizes, promising a rewarding experience for glass art enthusiasts.
Takeaways
- 🎨 The video is a tutorial on creating a large Chinese bowl using a simple technique with 30ml by 30ml squares of glass.
- 🛠 The process involves cutting up small squares of glass and arranging them in a desired pattern, which can be time-consuming but allows for creativity.
- 👍 Encouragement for viewers to like the video and leave comments, as it helps the creator improve future content.
- 📋 The materials used are specified, with a focus on Bullseye 90 COE glass, and a reminder to adjust schedules based on the user's glass and kiln.
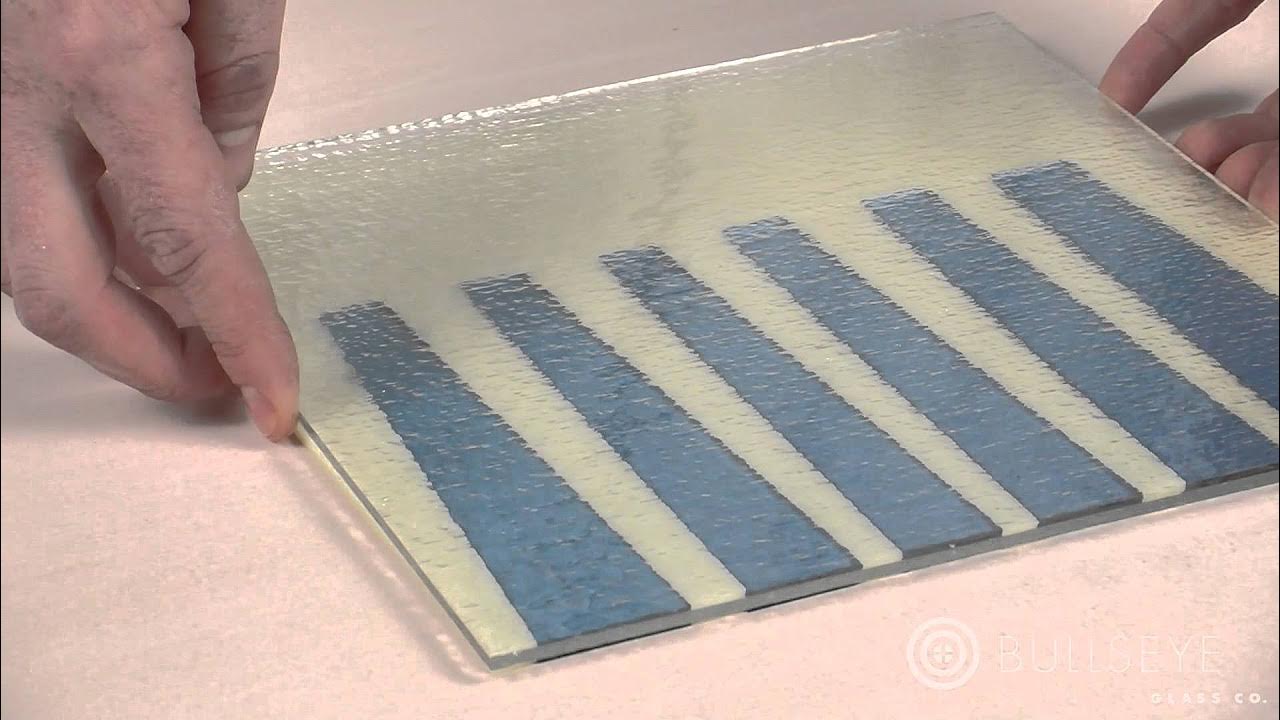
- 🔲 The project consists of two layers of glass: a clear glass bottom layer and a top layer of Bullseye 1332 fuchsia glass.
- 📏 The glass is cut into specific sizes, with 49 squares needed for the bottom layer and 36 for the top layer, plus additional strips and corner pieces.
- 📝 A pattern is drawn on a thin fire sheet to guide the arrangement of the glass pieces before assembling.
- 🔥 The glass pieces are fused together using a tack fuse method before being slumped into a Chinese bowl mold.
- 💎 The thickness of the glass used is mentioned, with a preference for 3mm for both layers, but 4mm is used for the bottom due to availability.
- 🌈 The final product showcases a beautiful fuchsia color and texture, with the potential for different colors to be used.
- 📚 The video ends with suggestions to try different sizes and shapes, and a teaser for a future video on making stands for the bowls.
Q & A
Who is the presenter in the video?
-The presenter in the video is Jeff from Rocket Rose Art.
What is the main project being demonstrated in the video?
-The main project being demonstrated is the creation of a large Chinese bowl using a simple technique with 30 ml by 30 ml squares of glass.
What type of glass is used in the project?
-The glass used in the project is Bullseye 90 COE glass.
Why does the presenter suggest adjusting the schedules given in the video?
-The presenter suggests adjusting the schedules because not every kiln fire is the same, and the schedules may need to be modified to suit the specific glass being used or the kiln's characteristics.
What is the size of the glass squares used for the bottom and top layers?
-The size of the glass squares used for both the bottom and top layers is 30 ml by 30 ml.
What color is used for the top layer of the bowl in the video?
-The top layer of the bowl is made using Bullseye 1332, which is fuchsia color.
What is the thickness of the glass used for the bottom layer of the bowl?
-The thickness of the glass used for the bottom layer is 4 mil, although the presenter mentions that 3 mil would normally be used.
What is the size of the piece that will be placed into the mold for slumping?
-The size of the piece that will be placed into the mold for slumping is 270 mils by 270 mils.
What is the first step in the glass cutting process according to the video?
-The first step in the glass cutting process is to cut up 30 ml strips and then cut them into 30 ml by 30 ml squares.
How does the presenter plan to finish the bowl after it is slumped?
-The presenter plans to mount the finished bowl on a stand, and mentions possibly making a transparent one and showing how to make these stands in a future video.
What additional advice does the presenter give for trying this project?
-The presenter advises to try different colors and suggests that the project could be done in different sizes and shapes, even considering rectangular or triangular shapes.
Outlines
🎨 Introduction to the Chinese Bowl Glass Art Project
Jeff introduces the project of creating a large Chinese bowl using a simple technique that involves cutting 30 ml by 30 ml squares of glass. He emphasizes the creativity involved and the tediousness due to the need for cutting numerous small squares. The process includes laying them up in a pattern and fusing them together. Jeff encourages viewers to like the video and comment for future content guidance. He also explains the materials, specifically mentioning the use of Bullseye 90 COE glass, and advises viewers to adjust schedules based on their glass and kiln settings. The video shows the preparation of two layers of glass, clear for the bottom and fuchsia for the top, which are cut, laid, and fused together before slumping in a mold.
🛠️ Step-by-Step Glass Cutting and Pattern Laying
Jeff demonstrates the process of cutting the glass into squares and strips, detailing the number of pieces needed for both the bottom and top layers of the bowl. He uses a piece of thin fire to draw a pattern that serves as a guide for laying the glass pieces. The video captures the meticulous work of assembling the glass pieces without glue, aiming for an impatient rush to the kiln. Once the pieces are fused, Jeff shows the texture and pattern that has emerged, highlighting the light effect that the bowl will have when completed.
🏺 Final Slumping and Finishing Touches
In the final stage, Jeff places the fused glass piece into a mold for the final slumping process. He reminds viewers to prepare molds with boron nitride instead of kilnwash. The result is a bowl with a beautiful fuchsia color and an interesting pattern that catches the light well. Jeff expresses his satisfaction with the outcome and encourages viewers to try different colors and shapes for their projects. He also hints at a future video on making stands for such glass art pieces and ends with a reminder to subscribe for more content.
Mindmap
Keywords
💡Rocket Rose Art
💡Chinese bowl
💡30 ml by 30 ml squares
💡Glass cutting
💡Tack fused
💡Bullseye 90 COE
💡Slumping
💡Kiln
💡Thin fire
💡Fuchsia
💡Mold
Highlights
Introduction to the project of making a large Chinese bowl using a simple technique with 30ml by 30ml squares of glass.
Emphasis on the creative aspect of the project, allowing for a lot of personalization.
Acknowledgment of the tediousness involved in cutting up many small squares of glass.
Invitation for viewers to like the video and leave comments for interaction and feedback.
Explanation of the materials and requirements, specifically mentioning the use of Bullseye 90 COE glass.
Instruction to adjust schedules based on the type of glass and kiln used, acknowledging variations in kiln firing.
Description of the glass layers used: clear glass for the bottom and Bullseye 1332 fuchsia for the top.
Process of cutting the glass into 30 by 30 mil squares and laying them up in a pattern.
Detailing the use of four mil clear glass for the bottom layer due to availability.
Recommendation to use three mil for both bottom and top layers for strength.
Demonstration of cutting clear pieces for the bottom layer, requiring 49 squares.
Explanation of the scoring and snapping process for the glass squares.
Cutting of the top layer squares and strips, including the number of pieces needed.
Introduction of the thin fire with a drawn pattern as a guide for glass layering.
Laying up the glass pieces without glue, aiming for an impatient kiln session.
Tack fusing the glass pieces and checking for any coal working needed before slumping.
Presentation of the fused and slumped bowl, highlighting the texture and pattern.
Final slumping of the bowl in a mold prepared with boron nitride instead of kilnwash.
Satisfaction with the final bowl's appearance, especially the fuchsia color and light effect.
Encouragement for viewers to try the project with different colors and sizes.
Teaser for a future video on making stands for glass art pieces.
Closing remarks with a prompt to subscribe and a farewell until the next video.
Transcripts


5.0 / 5 (0 votes)
Thanks for rating: